Starting Your Planted Tank
Last update: October 17, 1998
3551
1. Plan Your Approach
The first step (and the most difficult) is to decide what kind of planted
tank you want. Oh, sure, gorgeous, just like the photos in "The Optimum
Aquarium" is a wonderful goal, but be realistic. The more structured
and aesthetic a planted aquarium is, the more work it is to maintain. Don't
for a minute think that the perfectly aquascaped tanks you see in photos
remain that way for more than a day. Plants grow and they don't care much
about their appearance. If you want an aquatic water sculpture, be prepared
to do daily sculpting.
The best advice is to look on the Web, in books, in magazines, at fish
store displays and among your friends to find a style of tank you really
like. Ask pointed questions about the effort and expense to set it up and
the effort and expense to maintain it. Don't depend on verbal descriptions
like "My plant tank Rules!" and "My plants are gorgeous!"
Look at pictures or the real thing. Judge for yourself. Decide up front
if you will have the discipline to maintain the tank as required. And don't
mistake "high tech" for "low maintenance" -- they are totally different
animals.
Realistically assessing your abilities to create the desired tank is
essential to success. Setting lofty goals for yourself if you aren't able
to carry them to fruition is the first step to failure. It's better to
start slow and learn the essentials instead of investing in an expensive
and frustrating disaster.
In our case, we spent from 1986 to 1991 learning the ins and outs of
planted tanks before we went off the deep end with our "Dupla-spec" 90
gallon tank. By the time we began planning it, we knew our abilities and
were able to create a very successful display tank.
Once you have decided on a course of action, it is wise to document
your ideas and ask the advice of others. An excellent source of expert
and friendly critique is the Aquatic
Plants Digest mailing list.
2. Approach Your Plan
The best way to screw up your carefully laid plans is to rush into things.
Spend some time gathering your equipment. It is agonizing to go slow once
you have your goal in mind, but it is best.
Equipment
We have found it very useful to do "wet runs" of the equipment before actually
doing the real set up. Get your aquarium, stand, lights, filtration, plumbing
and substrate heating (if used) assembled and try things out before you
add the substrate, plants and fish. Make sure your plumbing doesn't leak
before you reach the point were you can't easily start over. Add
water to the bare tank and check water circulation by adding a sodium bicarbonate
mixture to your filter -- it stays milky long enough to visualize the circulation
patterns. Set up your CO2 system, adjust KH and set the CO2 flow to produce
the right pH. Check your heaters to make sure they are set to the right
temperature. Adjusting and tuning the equipment is so much easier
when you don't have expensive plants and fish in the water to worry about.
Stuff to Avoid
It is very tempting to go overboard on filtering, especially with the wealth
of stuff out there. The only things you want in your filters are mechanical
and biological media. Do not add a bunch of chemical filtration
paraphernalia like activated charcoal, phosphate absorbers, heavy metal
absorbers, zeolite, ultraviolet sterilizers and the like. The plants will
take care of this function naturally since most of the "bad" things are
needed for plant growth anyway. This will greatly disappoint your fish
store manager, but hang tough.
Likewise, save your money and pass on all the wonderful chemicals that
sound so helpful. No water conditioners, no bacteria starter cultures,
no pH buffers. Your aquarium is very capable of maintaining good chemistry
without a lot of commercial assistance.
Plants
As you get close to the big day, arrange for your starting stock of plants.
It is critical that your new tank is densely planted with fast growing
plants right from day one. The conditions in the new tank will be very
unstable and will be ripe for algae. Having thriving plants sucking up
nutrients right from the start is the best way to prevent algae from getting
a foothold.
If you have other plant tanks, let them grow out so you can use the
excess to stock the new tank. If you have nearby friends that have plant
tanks, try to beg or buy excess plants from them. The best thing for a
new tank is to get plants that are healthy and thriving and that are adapted
to the kind of conditions you are going to provide them.
Plants from fish shops and from mail order are a second best option.
Plants in fish shops are usually not grown in optimum conditions and are
probably dying as they sit in the shop's tanks. It's a rare store that
has proper lighting, CO2 levels and fertilizers in their plant holding
tanks. You may also find that the plants in the stores have been grown
emersed and are not yet adapted to a submersed existence. Mail order plants
may be of good quality (you only find this out by experience or word of
mouth) but the two to four day shipping time don't do them much good.
For your initial planting, select plants that are fast growing and don't
worry too much about aesthetics. The best plants to start with also tend
to be the least expensive plants, helping out your already strained budget.
Good starting species are Hygrophila (especially H.
polysperma), Bacopa, Rotala and Ludwigia.
All these do very well with good light and CO2. Plants to initially avoid
overdoing are Crytocoryne and Anubias.
Some people recommend dipping new plants in a weak bleach mixture to
kill off algae and algae spores. I do not recommend this as it also affects
the plants to some degree and will slow down their adaptation to the new
tank. Try to ensure the plant are visibly algae free or came from a relatively
algae free environment, then trust your algae eaters to do their job.
Fish
Some algae is inevitable in a new tank and the best defense is a variety
of algae eating fish. Black Sailfin Mollies are excellent algae eaters
if they are not fed regular fish food and they are fairly robust and can
easily tolerate the unstable initial conditions. After a week or two, more
sensitive algae eaters can be added to augment the mollies. Recommended
varieties are Siamese Algae Eaters (Crossocheilus siamensis),
various otocinclus sp. and Farlowella acus.
It is wise to have multiple varieties of algae eaters since they tend to
specialize on certain algae types. With three or four types, no algae is
safe.
Do not be concerned about high ammonia or nitrite levels during the
initial break-in. A heavily planted tank will show very low peaks of ammonia
and nitrite as the bacteria colony establishes itself. The plants themselves
consume ammonia in the form of ammonium (NH4++), preventing any major problems.
3. Ready! Fire! Aim!
Hopefully, you won't end up doing as the title suggests! For a humorous
account of what might go wrong, read the SLAG setup in the Kirb archives.
Assuming the tank and equipment are up and ready to go, the following
steps are appropriate for Day One.
-
Wash the gravel in small quantities. We like to use old 5 gallon pails
(clean, of course). Fill the pail 1/2 full with your gravel and rinse under
running water until the water runs clear.
-
If you have heating cables, use the first batch of clean gravel to stabilize
the cables (plain gravel is easier for this step than gravel mixed with
laterite -- that's really messy!). Gently spread 1/4" of gravel around
the bottom and pack it under the cables, holding them away from the bottom
glass. Gently add the rest of the gravel on top of the cables to hold them
in place. You only get one chance to get the cables arranged correctly,
so take your time. If you are recording the setup with a camera, takes
some photos now because this is the last time you'll see your precious
cables.
-
Wash more of your gravel, keeping track when you have done 1/3 of it. Mix
appropriate quantities of laterite in this first 1/3. If you use Dupla
laterite (Duplarit-G), crush the "root starter tablets" and mix them in
also. Very carefully add the gravel-laterite mixture to the tank, being
careful to not disturb the cables. A wise person will use gloves for this
step.
-
Level the first layer carefully. Don't try to create different levels with
the substrate as you might do for a fish only tank. They look nice at first
but once the plants grow, you'll never see them. And the gravel will tend
to flatten out over time anyway. If you want to create levels, do it with
the aquascaping.
-
Wash the rest of the gravel and add it to the tank. Level this off also.
If you want to get it really level, add just enough water so the
water is at the surface of the gravel. Any high or low spots will be obvious.
We use a sheet of 0.080" styrene from a hobby store as a leveling tool.
The styrene sheet also comes in handy during maintenance.
-
Add enough water to make the tank about 2/3 full. It's easier to work in
the tank if it's not full to the brim.
-
Start planting. You probably have some idea of the arrangement you want,
so knock yourself out! Don't worry about getting it perfect -- there is
plenty of time later for rearranging. You will probably be surprised at
how the plants grow (shape and height) so you will more than likely be
redoing your aquascape many times.
-
Add the rest of the water and immediately add the first of your algae eaters.
-
DO NOT FEED THE ALGAE EATERS!
-
DO NOT ADD CHEMICALS! Forget the commercial pH buffers, water conditioners
and items like this.
-
Stand back and admire your work. Don't worry, it will look much better
in a week or two.
A Case Study (of the wrong way to do it!)
When we first set up our 90 gallon tank, we had the noble but misguided
goal of buying all new plants to avoid introducing any residual algae from
our other tanks. Although it sounds logical, the bigger risks are not getting
decent plants to start with and maybe introducing new and exotic algae
that you don't know how to deal with. We also didn't pay attention to the
"fast growing plants at first" rule.
We ordered $200 worth of plants from a now defunct mail order supplier.
We ordered a few show plants - large Echinodorus and Anubias.
We ordered other decorative plants and only a token few fast growers. We
had the tank all set up and running the night before and waited in anticipation
for the UPS truck. It came on time and we eagerly tore into the box. We
were highly disappointed :-(
We had paid $5 extra for a styrofoam packing box but they didn't use
one. The plants were wrapped in newspaper, put in plastic bags and packed
in a plain cardboard box. All the taller show plants were actually folded
in half before they were wrapped and were bent and misshapen. Some of the
more delicate plants we ordered were frozen mush. Most of the plants were
fairly small and in poor condition. We were heart-broken :-((
We planted anyway, hoping against hope that the plants would recover.
The tank looked so barren after we planted $200 worth of plants that we
added plants from our other tanks anyway. The dismal result is shown below:
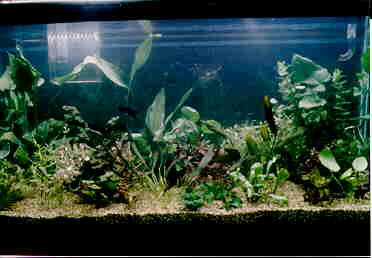 ... It did
get better...
... It did
get better...
4. Tough It Out
Two important things happen in the first month after you set the tank up:
the nitrifying bacteria colonize the tank and filters and the plants adapt
and get established. During this time, the water conditions in the tank
are very unstable as nutrient levels vary and myriad life forms discover
the wonderful new wet spot you have established for them. The best advice
is to sit back and enjoy the show. Trying to tamper with anything at this
point in time will only cause trouble.
The most common "problem" observed at this stage is new tank syndrome.
You will notice the water initially has a hazy white appearance. This is
due to a bacteria bloom in the water and is harmless and natural.
Your new gravel came from places unknown and contains lots of dormant critters
that washing will not remove. Getting the gravel wet revitalized them and
they will grow for a short time. Most likely, they will die from lack of
food or they will become food for higher order critters. Do not use any
of the clarifying chemicals sold for this purpose. It's pointless and a
waste of money and will only contribute to a longer period of unstability.
You may also observe that the plants don't seem to be growing much.
Don't panic. Two things are at work here. First, the plants may be starved
of nutrients if they came from other than great conditions. Plants can
concentrate and store many trace elements for "hard times" (such as being
in a fish store holding tank) and they may replenishing their supply in
lieu of using the nutrients for growth. Secondly, the plants may
be growing and you just can't see it because you're looking so darn
hard! Take lots of photos of your new tank and you may be surprised
just how much is happening.
It is very important to not feed the initial algae eaters. Make
them scrounge the tank for anything they can find. Algae will be springing
up just like everything else and needs to be controlled. If the fish are
not distracted by real fish food, they will be more likely to search out
and destroy the tender young algae shoots.
During the first month, the nitrifying bacteria will be establishing
colonies everywhere in the tank (not just in the filter). If you want to
monitor the cycle by measuring ammonia, nitrite and nitrate, make sure
you have accurate test kits. The traditional cycle is longer in a planted
tank and the peaks are much more subdued. There are two reasons why this
is true:
-
Since you have a low fish load and you are not feeding the fish, there
is not much ammonia being generated.
-
The plants are using much of the ammonium generated by the fish, leaving
little for the nitrifying bacteria to use as food.
By the way, recent research has found that the bacteria responsible for
converting nitrite to nitrate is not Nitrobacter as
is commonly believed. They don't know what species it is, but they know
it's not Nitrobacter.
Don't change water during the initial break-in period. There is no good
reason to change water and fresh water will only add to the instability
by refreshing whatever caused the instability in the first place.
Be sure to properly fertilize the plants. They are trying to grow rapidly
and need all the nutrients they can get (in proper proportions, of course
-- don't over do it).
If you monitor iron levels, you will note that it will probably be high
initially due to the fresh laterite. We typically see levels of 0.5 mg/l.
This is OK, since the nitrifying bacteria use iron to grow and the plants
can concentrate and store excess amounts. You will be shooting for 0.1
mg/l of iron in the long run.
After a couple of weeks, conditions should be stable enough for other
algae eaters. Remember, a variety is good!
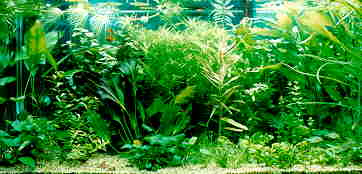 ... A little
later
... A little
later
5. Adapting to Your New Aquarium
After a month or two, you will find that your new planted tank is coming
into its own. A careful observer will be fascinated by all the stuff going
on in the system. If you keep a log book, review your observations regularly.
If you don't keep a log book, shame on you!
By now, plants should be ready for their first trimming and perhaps
some rearranging. You may find some plants that didn't do well for whatever
reason and need to be replaced. You may be surprised at the growth
patterns of some plants that may affect your aquascaping scheme. You may
want to try some slower growing, more decorative plants for special effects.
For whatever reason, you'll probably be mucking doing Real Aquatic Gardening.
If you find you don't enjoy this, you might reconsider what you are doing.
One thing that worries new aquatic gardeners is just how to prune and
arrange plants. Some are very reticent to move plants or even prune them.
Don't worry -- plants respond well to "tough love". Don't be afraid
to uproot plants and move them around. We are only careful about moving
plants with massive roots systems like Echinodorus or plants
that grow in large masses like Cryptocoryne and only then
because it makes a mess when you pull them up!
You can prune stem plants two ways:
-
Uproot them, cut the prettiest part off the top and replant the pretty
part. This is the way a planted tank is sculpted.
-
Trim the top and replant it. The bottom will grow a new top; usually
bushing out at that point. This is the typical way that stem plants are
propagated.
Pruning rosette plants usually entails pulling the older leaves off at
the gravel level.
This is the time to start adding the primary fish to the tank. The biological
filter is established and the system should now be very stable. Add fish
slowly, though, so the nitrifying bacteria can adapt to the new load slowly.
You may find that different types of algae are coming and going as the
water conditions pass through stages favorable to different species. Don't
panic. Let the algae eaters do their job. If you find one algae type
is getting a toehold, perhaps this is the time for another type of algae
eater. We usually see a soft, velvety green algae at about this period.
Farlowella acus are very good at controlling it. You also
may notice long, stringy algae threads that don't attach securely to the
plants. This is usually a sign of too much iron. We've not seen any algae
eaters eat this type but it can be easily removed by twirling a toothbrush
in it.
Monitoring nitrates will give you an idea of how often to change water.
We like to keep nitrates at around 10 mg/l on average. If you have a lower
fish load, you may find that nitrates will consistently read zero (make
sure you have a good test kit!). If this is the case, you may find you
need to add nitrates, usually in the form of potassium nitrate.
It is recommended that there are at least 5 mg/l of nitrate in a planted
tank. If nitrates are too low, the plants won't be able to grow and remove
the phosphates that are in the water, leading to algae problems.
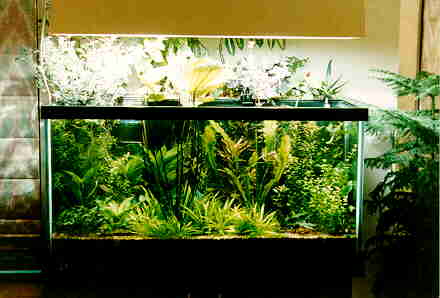 ... Even
later!
... Even
later!
6. The Daily Grind
Maintenance is covered fully in another section, but I would like to list
what is typical for an established planted tank.
Daily
-
Regular fertilization. We use Duplaplant-24 drops which are added daily.
Duplaplant tablets are added only when water is changed. You will need
to observe your plants and do iron tests to determine exactly how much
fertilizer is proper for your setup.
-
Water top off. Water will evaporate from your tanks. Our 120 gallon, open
top tank losses about one gallon per day due to our dry climate! Distilled
water is the best way to replenish evaporation but is not cheap. Remember,
only the water evaporates; hardness, fertilizer and waste products stay
in the water. If your tap water is hard, you will be increasing salts in
the water as time goes on. This is another reason for regular water changes.
-
Feeding fish. Of course.
Biweekly
-
Regular water changes. The importance of this cannot be stressed enough.
Even though your nitrates may be low, there are other waste products that
build up in the water that need to be removed. No matter how carefully
set up, an aquarium is never "balanced" enough to never need water changes.
We change water every two weeks. How much you change is dictated by your
nitrate levels, but every two weeks is a good period. You will find that
glass needs to be cleaned and plants need to be pruned about this often.
-
Plant pruning. The plants will grow well and will need trimming to prevent
that jungle look. You need to watch out for taller plants shading shorter
plants. Moving plants around is good since they tend to generate waste
products around their roots which may stunt their growth. This also acts
to stir up the gravel a bit and keep it friable.
-
Glass cleaning. An algae film will grow on the glass and may not be taken
care of completely by algae eaters. You will also get hard, green spot
algae on the glass which is too tough or unpalatable and must be removed
by you. On glass tanks, a razor blade may be needed. It doesn't stick as
well to acrylic and can be wiped off with a buffing pad.
-
Gravel vacuuming. When plants are uprooted for trimming, we like to vacuum
the top layer of the gravel in the area with a Python water changer. This
helps prevent a lot of detritus from collecting.
-
Filter cleaning. Keeping your filter material clean will make sure the
proper flow is achieved, that the pump is not stressed and that nitrates
aren't being generated by decomposing crud.
Periodically
-
Water testing. Until you can recognize water imbalances by sight, water
testing is recommended. After that, periodic checks are useful to make
sure your long term maintenance is consistent with current aquarium conditions.
-
pH electrode calibration. If you use a pH controller, the pH electrode
will drift over time and need to be recalibrated. Remember, even though
the controller reads "pH 7.00", that number may not be right! We
like to check pH manually at least monthly to make sure the meters are
reading correctly.
-
New light bulbs. Although fluorescent bulbs will operate for years, they
slowly loose intensity. Depending on how "on the edge" your intensity was
to start with, you may find that you need to replace bulbs before they
burn out. We try to replace half the bulbs every six months to avoid intensity
spikes.
Every couple of years
-
Every so often a planted aquarium will just get out of control, plant-wise.
Typically, we don't trim Anubias and they just keep getting
bigger and bigger. We find that we must defoliate the tank every so often
and do a major trimming and replanting. We try to time this to coincide
with the local aquarium club's Spring or Fall convention and auction. You
would be surprised what people will pay for what you might throw away!