Chapter 4 Plants
Copyright 2000 by George and Karla Booth
We have always been fascinated by the beauty of carefully planted freshwater display tanks. With their interplay of brilliant and subtle colors, well lit and shadowy areas, gentle motions and seemingly contented fish, such an aquarium always had a calming affect on us, easing the day to day stress of modern life. Whether in a public aquarium or a tropical fish shop, we always headed first for the planted tanks, saving the more popular reef exhibits and shark tanks for later if we had time.
As college students, we tried to duplicate the tanks we had seen with the usual luck most aquarists have with plants. We had a home-built 50 gallon tank that was home to an assortment of South American cichlids. Even though the area had very hard water, we managed to keep a few plant specimens and had fun watching an occasional Aponogeton "Wonder Bulb" burst into a giant plant. Unfortunately, after graduating we became too busy getting established in new jobs and setting up a new home to find time for fish keeping and we sold off our aquarium.
Even though we weren't active hobbyists, we would frequently take time to visit aquarium stores just to see what they had and what was new. Seven years ago, during a visit to a local shop, we saw a 40 gallon tank planted with pair of Amazon swords. It wasn't particularly impressive, but it rekindled our interest in aquarium plants. The time was right and it wasn't long before we were shopping for our new plant tank.
We were surprised at how much had changed in 10 years and at the same time, how much of the old equipment we used to have was still popular. We ended up with an acrylic 85 gallon tank and a typical setup: under gravel filter (UGF), powerheads, heaters and the usual accessories.
We had seen aquariums set up with beautiful fish displays along with an occasional plant or rock. We had also seen "aquatic gardens" that were densely planted lush green tanks but with very few fish - just a few small tetras and housekeeping fish. What we wanted to achieve was an aesthetically appealing planted tank in which we could display both large specimen plants and beautiful fish.
The tank started as a community tank with the normal assortment of angelfish, gouramis, catfish and odds and ends along with all the varieties of plants we could find. We didn't have much luck at first, but gradually managed to get a few plants growing well through trial and error.
A short while after we set up the tank, we happened across a copy of "The Optimum Aquarium" (Horst and Kipper, Aqua Documenta, 1986). This book was a real eye-opener, since it described a very methodical and scientific approach to the style of aquarium we desired. Some of the technology was way beyond our price range at the time, but we were able to adapt some of the principles and began to enjoy an unprecedented level of success. The key changes were the addition of a carbon dioxide (CO2) injection system and the use of trace element supplements.
CO2 injection seems to be one of those items that marks a freshwater aquarium as "state of the art", much like trickle filters and protein skimmers used to be for marine systems. It appears that interest in freshwater plants is becoming more prevalent, as evidenced by renewed interest in organizations like the Aquatic Gardeners Association. Because of this, CO2 injection and other "high tech" freshwater equipment should soon be commonplace and accessible to the average aquarist.
The original tank has evolved to the point of being a species tank supporting 16 large and colorful Melanotaeniidae (Australian and New Guinea Rainbowfish) and quite a lush assortment of plants. It is still filtered by an under gravel filter with 2 powerheads (supposedly bad for plants!), supplemented by an Eheim 2217 canister filter. Submersible heaters maintain this tank at 76o F. Lighting is supplied by four 40 watt fluorescent bulbs (two Triton, one Penn-Plax Ultra Tri-Lux, one Coralife Trichromatic). The substrate is 2.5" of plain quartz gravel with no additives. Besides the manual CO2 injection system, Dupla products are used to provide plant nutrients and proper water chemistry.
After the Rainbow tank was running for awhile, we succumbed to the dreaded aquarist disease, "more-fish-itis". A new tank was set up in a very traditional manner, and unfortunately, has produced only mediocre results.
This "low tech" tank is a 55 gallon tank, moderately planted and providing a home for 3 pairs of Angelfish, some Rainbows and assorted maintenance fish. This tank has an UGF supplemented by an Eheim 2213 filter and is kept at 78o F. No CO2 injection is used in this tank. It is planted with Echinodorus and other odds and ends. Even though we use the same fertilizers, trace elements and lighting, plants just don't seem to flourish in this tank. Setting up this tank didn't really cure our disease. In fact, it made it worse and prompted us to "go off the deep end" and set up a discus show tank.
The Almost Optimum Aquarium (AOA) is a 100 gallon, heavily planted, discus show tank. The tank itself is a 60" long by 18" wide by 20" tall acrylic tank with a custom made oak stand and hood. Filtration is provided by a trickle filter and an Eheim 2217 canister filter. Two Ebo-Jaeger 150 watt heaters keep the water temperature at 83o F. Lighting is supplied by four 40 watt fluorescent tubes (two Triton, one Ultra Tri-Lux and one Trichromatic). The substrate is 3" of quartz gravel with Duplarit G (laterite) mixed in the lower 1/3 (there is no provision for artificial water movement in the substrate). The tank has an automated CO2 injection system. Like the Rainbow tank, Dupla products are used to provide proper water chemistry and plant nutrients.
The AOA is heavily planted with Echinodorus, Anubias and Ludwigia along with other assorted plants for texture and color contrast. An E. bleheri "owns" about 1/3 the tank and has spread from a single medium size plant into three enormous plants. The tank currently supports eight medium to full grown discus, a school of 27 cardinal tetras and some assorted corys and algae consumers.
The AOA adheres closely to the concepts presented in "The Optimum Aquarium". The only deviation was not using substrate heating cables (for cost reasons). Even without the substrate heating, plant growth has been phenomenal and the tank has proved to be a wonderful environment for discus and a school of cardinal tetras.
After our success in the past year with our Almost Optimum Aquarium, we recently got the urge to go one better ("more-fish-itis" is apparently incurable).
Although we knew it would be expensive, we decided to set up a new aquarium fully compliant with the Dupla concepts. Experience with our other plant tanks gave us some ideas of what we wanted to incorporate into our new "Super Show Tank" or SST. With the new tank, we will have a full range of aquarium technologies for comparative purposes.
Our current large tanks are very traditional in appearance with full hoods enclosing fluorescent lights. Over the years we have always been amazed when we lifted the hood for feeding or maintenance and saw the plants from the top. Ludwigia repens looks especially nice from above when it grows along the top of the tank. We have also seen plant tanks in local stores that had metal halide lights and really liked the brightness, color rendition and shadow effects that resulted. For our new tank, we decided to have an open top with suspended metal halide lighting.
The suspended lighting also allows us to try out the concept of having house plants on a shelf behind the tank. We have heard that philodendron roots in the water will help keep nitrates under control. We will be able to test this concept in the SST.
Height has always been a problem with the previous tanks. Twenty inches or less just never seemed to be quite high enough to really show off our plants to advantage. When shopping for tanks, we found that 24" was about as high as we could go and still have reasonable access for plant maintenance. Both my wife and I are tall, but anything over 24" would mean reaching into the tank up to our shoulders. This didn't sound appealing!
Having an engineer in the family meant the technical equipment also had to be of "show" quality. Cabinet lights, electrical systems and plumbing had to be well designed and look professional.
This tank should be able to support even the most "difficult" of plants if
the substrate heating lives up to its claims. We will try some of the
plants we have shied away from in the past. We especially hope to be
able to grow Barclaya longifolia in this tank. It will be a discus and
dwarf cichlid tank, requiring higher temperatures. This would seem to
rule out some plants, but we have found many plants that supposedly
don't like high temperatures thrive in the AOA.
Chapter 2 Hardware
The tank is an "All-Glass" brand 90 gallon glass tank with no obstructions over the top. Other brands had a reinforcement across the middle of the tank, blocking access and visually distracting the viewer. It is made from 1/2" tempered glass and is 48" long by 18" wide by 24" tall (79 gallon capacity). As it turns out, the tank was the only component of the set up that didn't require customizing in some way ("Some Assembly Required"). If we had decided to drill a hole in the untempered bottom for a filter overflow, we could have had a perfect record!
It is important to determine the actual water capacity of a tank so that proper doses of fertilizers, water conditioners and medicines can be calculated. The inside dimensions of the tank are 47" by 17" with a water depth of 23", giving a true capacity of 80 gallons. Once the gravel is added, the water capacity will be reduced to 73 gallons.
One thing about a large glass tank - they sure are heavy compared to an acrylic tank! We were also surprised at the amount of distortion the thick glass causes. Acrylic has an index of refraction close to that of water and the acrylic is thinner, making for very little optical distortion. A plus for the glass tank is the fact that the sides and back provide more of a "mirror" effect than the acrylic tanks. When we look in from the top, the sides and back reflect the plants, giving an impression of a much larger tank.
The stand is a simple commercial unit made by Oceanic. It was stained a medium dull brown which we darkened to match the woodwork around it. We also gave it a coat of satin polyurethane to impart a more finished look and protect it from water splashes. The stand is of basic 2x4 construction with an open top and bottom. The open top is nice because we can see the bottom of the tank from inside the stand and can monitor root growth. We cut some 3/4" plywood to fit in the open bottom to provide a large flush area for the equipment. The plywood is covered with wood-grain shelf paper to match the cabinet.
Besides refinishing the stand, we removed a center brace in the front between the doors. The doors are each only 1 foot wide and with the center brace, access to the cabinet was severely restricted. We wanted the trickle filter to be inside the cabinet and the center brace made it impossible to remove for cleaning. The brace was then glued to one of the doors to prevent a gap. By the way, newer versions of the cabinet are built this way.
The tank and stand are positioned about 12" away from the wall, next to a planter box. A plant shelf is positioned between the tank and the wall, about 6" below the tank top. This allows us to have small plants behind the tank and larger plants beside the tank in the planter box. The overall effect we hope to achieve is a view into a pool in the middle of a tropical jungle.
We had at first thought about using the planter box as an indoor pond and trickle filter sump. The idea was to put water hyacinths in the pond to take care of nitrates and reduce the need for water changes. After some thought, we became concerned about heat loss, evaporation and excess CO2 usage. We also were afraid the water hyacinth might out compete the other aquatic plants for nutrients. We still might make a small pond in the planter box, but keep it separate from the SST.
One goal of the SST was to provide proper and convenient electrical connections. Our other tanks use commercial power strips to connect all the accessories and provide control. During tank maintenance, we are constantly fumbling around in the cabinet to unplug this or that.
The SST is protected by a Ground Fault Interrupter (GFI). We replaced the normal electrical wall receptacle by the tank with a Leviton unit that protects both sockets. A plug-in surge protector goes between one of the sockets and the electronic equipment controlling temperature and pH in the tank. The tank lighting is plugged into the other socket.
Two quad wall outlets are mounted inside the cabinet to provide power connections for the various accessories. One of the quad outlets is controlled by a on-off switch mounted on a "control panel" in the cabinet. Items which are turned off for maintenance are connected to this outlet. The other outlet is on all the time. Both of the outlet sets are protected by the GFI and surge protector.
A second on-off switch is connected to a fluorescent strip light to provide illumination in the cabinet. The light has proven to be an excellent idea, allowing us to easily work in the cabinet without using a flashlight or dragging an external light around. We plan to retrofit lights to our other aquarium cabinets.
The control panel also has a power strip mounted in it, giving us a convenient place to plug in the dual light timers. The power strip is plugged directly into the GFI protected wall outlet.
After working with the new tank for a few days, we decided that the "control panel" is actually a necessity, not a luxury. Being able to simply turn off the filter with a switch and having light when and where we need it makes us wonder why we didn't do it before. (If Karla knew how much fun it is working with solid 14 gauge wire, she would realize why we haven't done it before!)
Lighting for the tank is provided by a Hamilton Technologies Deluxe light hood. It is a 48" long unit that has two 175 watt 5500K metal halide (MH) bulbs and two 40 watt fluorescent sockets. We are using Triton fluorescent bulbs. The lights are suspended 12" over the water surface, providing light for the tank, the plants on the shelf behind the tank (and most of the rest of the house!).
This is our first personal experience with MH lighting and we are very impressed, to say the least. The 5500K bulbs provide a very white light and the Tritons add a reddish cast that is very pleasing. The MH lights come on at 12 noon and go off at 8 pm (at least until the plants are established). The fluorescent lights come on at 4 pm and go off at 10 pm, providing a sunset-like effect with their reddish light. Since the MH lights take about five minutes to reach full brilliance, we are not concerned about simulating a sunrise.
The design of the Hamilton unit seems very well done. The ballasts for both sets of lights are contained in a remote box with about 10 feet of cord and connectors between the hood and ballasts. Each set of lights has a separate power cord, allowing separate timers. A fan is in the hood and runs just when the MH lights are on. An acrylic panel goes across the bottom to protect from water splashes. We were surprised that the MH ballast is almost silent (we had seen cheaper units in hydroponics stores that hummed very loudly).
The only work we had to do with the lights was to drill two small holes in the top and attach some common swag hooks with which to hang the hood. More swag hooks with toggle bolts were mounted in the ceiling above the tank and the hood is suspended via decorative chain. The hood is very light, so strength in the mounting hardware is not required. The ballast sits on the floor behind the tank (it weighs about 30 pounds).
We had to paint the hood since it comes in basic black and our walls are off-white. With the fan, the hood barely gets warm to the touch so any kind of paint will do. We chose Rustoleum "Almond" spray paint. We also painted the cables that go from the light to the ballast since they come in a very visible bright red!
The primary difference between the SST and the AOA is the substrate heating coils. Dupla stresses that this is very important, since it "integrates the substrate into the rest of the aquarium" by providing gentle water movement through the substrate. There are some other benefits that we have learned about that will be covered in the section on water chemistry.
We selected the 250 watt heating coils offered by Dupla even though this is more than they recommend for a tank of this size. We justified our decision by noting that the tank will be warmer than the Dupla recommendation (82 o F versus 76 o F), the house is kept fairly cool in the winter (68 o F), the top will be open, and glass is a poor insulator compared to acrylic. 250 watts seems appropriate since we use two 100 watt heaters in the AOA. An Ebo-Jaeger 200 watt heater is used as a backup in case the coils can't maintain the temperature on cold winter nights.
What we didn't understand was that the cable rating seems to be based on the bottom area of a specific tank size rather than the amount of heat needed. When we installed the cables, we found that the cable was too long for the tank if we used the spacing dictated by the Dupla cable anchors. We solved the problem by turning the spacers at a 45 degree angle, causing the spacing to be less than standard. This also has the benefit of locking the cables tightly into the anchors, giving us more control when we arranged the cable (it has a pretty good "set" because it comes tightly coiled when it is packed and it doesn't like to lay straight). We feel that, within limits, the spacing is not critical to the operation of the coils. The pictures in "The Optimum Aquarium" show a much tighter spacing than we are using and there is nothing in the instructions that say otherwise.
The heating cable is secured to the bottom with 42 Dupla cable anchors. This is slightly less than recommended (they are spaced 8" apart rather than 6"). It is not clear why so many anchors are needed, since the gravel will do a pretty good job of keeping the cable in place. The only obvious thing is to prevent the cable from moving when plants are uprooted in case the plant roots get tangled in the cable. Since the cables are within 1/8" of the tank bottom and they are coated with a very slippery silicon rubber, we aren't very concerned about this.
The heating coils are driven by a 250 watt Duplamat stepdown transformer operating at 24 volts. The low cable voltage provides a safety factor in case the cable sheath is nicked or broken accidently. The Duplamat plugs into a special plug provided with the DuplaTherm controller.
The DuplaTherm Digital controller is a nicely designed unit with two temperature sensors, one for control and an independent sensor for the digital display. Having a separate display sensor allows one to move the sensor around the tank to make sure there are no hot or cold spots. The one inconvenient factor is the special 110 volt AC plug used on the unit. It is designed for German receptacles and requires an adaptor from Radio Shack. A normal U.S. style plug can't be put on the power cable because the plug also controls the DuplaMat transformer. We had to drill a 1 1/2" hole in the back of the cabinet to support the German plug and then connect the Radio Shack adaptor to it.
The controller currently maintains the temperature at 80 +/- 0.1o F. Once the plants have acclimated and we remove the "seed" fish, we will raise it to 82 o F for the discus and rams.
Filtration for the SST is handled completely by a trickle filter. The filter is an Amiracle 150, rated for a 100 gallon saltwater tank. This rating seems a little optimistic since the media chamber only holds 4 gallons of bio-media. However, based on our experience with the AOA, this is sufficient for a 80 gallon (true capacity), moderately loaded freshwater tank. The only requirement that seems relevant is to provide enough surface area for nitrifying bacteria, and since we measure 0 ppm ammonia in the AOA, we seem to have enough. The AOA uses an unknown brand of blue, spiked bio-balls for media, with an unknown surface area per gallon.
The Amiracle filter has no provision for an external pump, so we had to drill a 1 3/4" hole in the end for a 3/4" PVC bulkhead fitting. The bulkhead fitting is connected to a 3/4" union and then goes to the pump via a 6" length of flexible vinyl tubing. Vinyl tubing was used to isolate any pump noise from the filter and to allow for any slight misalignment between the pump and filter.
A Rainbow Quiet One pump was used to return filtered water to the tank. This pump is absolutely quiet in this application and is far superior to any submersible pump we have tried, both in terms of flow volume and noise. Depending on the plumbing and head it pumps against, it can pump 400 to 1000 gallons per hour (GPH).
We initially used all 3/4" PVC to plumb the pump, providing for two returns to the tank. This allowed a maximum of 800 GPH and needed to be adjusted to the 400 GPH capacity of the trickle filter. We discovered that the 3/4" ball valves needed to be almost closed to get the right flow and made it very hard to perform fine adjustments. The increased back pressure also caused a few leaks in the threaded joints of the plumbing. After being unable to seal the leaks, the plumbing was rebuilt with 1/2" PVC (3/4" flexible vinyl tubing was still used for tank returns). The 1/2" PVC reduced the maximum flow to about 500 GPH which is easily modulated with 1/2" ball valves. Besides the 2 tank returns, a third 1/2" ball valve supplies water to the CO2 reactor in the trickle filter sump.
The two tank returns use 3/4" Lee's siphon tubes to get the 180 degree bend required to get over the rim of the tank. Two more siphon tubes were cut in half to provide 90 degree elbows for directional control. One of the returns is directed across the bottom, aimed left to right and slightly towards the front of the tank. The other return is directed 2" below the top, from right to left and slightly toward the front. The intent was to provide good water movement in the tank in a circular pattern. This was verified before plants were added by mixing up a tablespoon of calcium carbonate in a cup of water and pouring it into the trickle filter sump. The calcium carbonate dissolves slowly and provides a cloudy solution that makes the water movement visible for a few minutes.
The trickle filter has the usual skimmer box and pre-filter. A cylindrical piece of foam wrapped in a piece of drip plate filter pad replaces the DLS in the pre-filter. We found that the DLS clogs easily and is very difficult to clean. The filter pad prevents the foam from clogging and is simple to replace. This acts as the primary mechanical filter in the tank.
The filter has a drip plate instead of rotating spray bars, providing a mechanically simple and trouble-free water distribution system. The filter comes with a thin pad over the drip plate to keep debris from the media chamber, but we found that the pad soon became clogged, causing most of the water to bypass the drip plate. The reason for this appears to be that just the small part of the pad over each hole passes any water. These little 3/16" diameter areas clog in a couple of days, even with the pre-filter.
Our solution to this problem was to cut a piece of DLS separator (the black plastic mesh) to fit the drip tray and to hold the pad 1/4" above the drip plate. A smaller piece of mesh was placed on top of the pad to prevent it from contacting the water inlet. With this in place, the entire pad area is available to filter the water and there are no "dry" areas on the drip plate. When the filter is running, we can see an even flow across the entire plate.
The media selected for the filter was the new Dupla BioKascade bio-balls. The initial reason was simply to have the latest style media, but it does seem to perform better than our old, generic balls. The BioKascades have an internal vane structure that appears unidirectional. The balls were individually placed so that the vanes are roughly horizontal. Our idea was to provide a horizontal cascading action rather than a vertical drop (bio "cascades"?). This appears to cause less outgassing of CO2, compared to the trickle filter with the standard bioballs. Of course, there wasn't any biological usage of CO2 when this was tested, so this is conjecture at this point.
The balls are 1 5/8" in diameter and happened to pack fairly well into the media chamber. We were able to get 238 balls into the 3.99 gallon space, using 59.6 balls per gallon. Dupla suggests that there are 54 balls per gallon, which would be true if they packed as perfect cubes.
We are not pumping any air into the media chamber as most manufacturers suggest. We feel that the photosynthesis in the tank will provide all the oxygen needed by the nitrifying bacteria colonies. We originally had air injection in the AOA filter but noticed no difference in any parameters, especially ORP, after turning it off. The only difference we noted was the lack of annoying air pump hum. We also feel that air injection causes excessive CO2 loss in a system like this. After we turned off the pump, we went from an average of 6 weeks between CO2 refills to 11 weeks.
We feel that CO2 injection is a key element in a successful and stable plant tank. The SST, like the AOA, uses a fully automated CO2 system to provide the proper levels of CO2 for optimum plant growth and stable pH.
The heart of the system is a Sandpoint II pH and ORP controller. The ORP (Oxidation Reduction Potential) is not controlled, but is monitored to ensure that the water is high quality. Typically, ORP will begin to drop if we wait too long to change one of the filter pads. ORP generally runs in the 550 mV range in the AOA. The pH is controlled by injecting CO2 when the pH is above the setpoint (6.8) by 0.05 pH units. The CO2 is turned off when the pH is 0.05 units below the set point, providing for a stable pH of 6.8 +/- 0.05.
The CO2 system is fed from a 20 pound CO2 bottle with a commercial two stage regulator, solenoid and fine control valve from local sources. The Air Products 1102 regulator has high and low pressure gauges and a control to set the low pressure. We set the low pressure to be 10 to 20 psi to allow fine adjustments of the actual flow. The ASCO 8210G1 solenoid is capable of controlling up to 200 psi and plugs directly into the Sandpoint controller.
A Nupro B-4MG2 needle valve provides the final flow adjustment into the reactor. With the low pressures we use, the valve can easily be set to a flow of 1 bubble every 10 seconds. Initially, we have it set for about 2 bubbles every 3 seconds when the solenoid is on.
A Dupla bubble counter provides a visual indication of the CO2 flow and provides a check valve to prevent water from backing up into the solenoid and regulator (something to be avoided!). Three millimeter silicon tubing is used to connect the bubble counter to the valve and reactor. The bubble counter is mounted on the front of the trickle filter so it is easy to monitor.
The Dupla Reactor "S" sits in the sump of the trickle filter and receives
water from one of the ball valves fed by the Quiet One pump. The outlet
of the reactor is in the sump and has a short piece of vinyl tube on it to
direct the CO2 injected water towards the bulkhead fitting.
Chapter 3 Environment
The substrate in a plant tank has three purposes. First and foremost, it provides a source of nutrients for the plants via adsorption through the plant roots. Second, it provides an anchor for the plants. Third, it provides an attractive and natural looking background for both the plants and fish.
There are some things the substrate should not do in a plant tank. For one thing, the substrate should not alter the water chemistry in the aquarium. Some types of commonly sold aquarium gravels contain limestone or calcium and can lead to uncontrolled hardening of the water. This may be fine for African Rift Lake cichlids, but is a severe problem for the plants and fish typically found in heavily planted tanks.
Another important factor in selecting the substrate material is the grain size. It should be selected such that it is neither too fine nor too coarse. Too fine a material will tend to become solid over time, due to biological waste material acting as a "mortar" between the substrate grains. As reported in "The Optimum Aquarium", this is a long process, taking on the order of many years to become a problem. The overall effect is to prevent nutrients from reaching the plant roots.
Gravel that is too coarse has two obvious problems. First, it will not offer a very good foothold for the plants, especially plants that have delicate roots. The second is that excess food and fish waste can settle into the rather large gaps in the gravel, making it difficult for scavengers to get to it. This leads to excess nitrate buildup as the material decomposes and leads to water quality problems in the long run.
Fortunately, the most common kind of aquarium gravel available in the fish shops meets all these criteria. We selected a common quartz gravel sold as "sandblasting gravel". The brand we bought is named "TexBlast" and is light brown in color with a grain size of between 1/16" and 1/8" (2-3 mm).
The SST has 3 1/2" of gravel, amounting to 150 pounds or 3 bags. The amount of this gravel needed for a tank can be calculated by determining the volume of gravel needed (in our case 47" x 17" by 3.5") and dividing by 19 cu.in. per pound. Also note that this gravel displaces 2.4 gallons per 50 pounds. This is useful when determining the true water capacity of the aquarium.
Most plant books recommend that some additives be put in the substrate to enhance plant growth. Substances like peat, potting soil, sand and clay are often mentioned. "The Optimum Aquarium" recommends the use of laterite in the lower one third of the substrate. The book is lacking in specific reasons for using laterite, but leaves the impression that the main reason is to supply iron to the plant roots.
One clue to the real function of laterite and substrate heating is the claim that they "integrate the substrate into the aquarium". The following information is credited to Jeff Frank and provides more insight into what this may really mean. Hopefully, we haven't introduced too many errors in our paraphrasing of his comments.
Laterite is a remnant of volcanic rock which has been highly weathered by exposure to tropical temperature, precipitation, and forest derived humic acids over geologic time. Laterite, or any clay for that matter, has a crystalline structure which has many negatively charged sites which are important for plant chemistry. Except for decomposed organic matter there are no negatively charged sites in the aquarium. Soils from temperate regions (clay fractions of which are relevant for comparison to the tropical laterite) not exposed to the accelerated weathering of the tropics retain too much Ca++ and Mg++ which will adversely affect hardness and pH in a plant tank.
Many sources agree that ammonium is the preferred form of nitrogen for plant utilization. Ammonium, and many other positively charged ions like Fe++, K+, Ca++, Mg++, and Na++, are attracted by the negatively charged sites provided by the laterite.
The negative sites attract and hold the ammonium ions like a magnet until a plant root hair exchanges another positively charged ion for the ammonium (adsorption) and takes it in to metabolize into amino acids, and ultimately protein. By providing this readily usable source of nitrogen, the additional benefit of removing ammonia (due to ammonia/ammonium equilibrium) is realized. Instead of just the "ammonia to nitrite to nitrate" cycle in biologic filtration, the "nitrogen cycle" and its accumulating nitrate levels is avoided altogether. The nitrogen ends up being removed from the tank as you cut and prune excess plant tissue because plant tissue is partly made of protein, which is 14% nitrogen.
The substrate heating coils are an important element in the substrate for a number of reasons. The primary reason is that the substrate immediately around and just above the cable is heated a few degrees higher than the ambient water and rest of the substrate. This provides a gentle convection current, bringing nutrients into the laterite area of the substrate where they can be held and made available to the plant roots. Cables work well in this aspect, compared to a heating pad or other methods, since the spacing between the coils and being positioned slightly above the tank bottom provides a fireplace-like draft. The slow current is important because it better matches the rate at which reduction reactions occur (as compared to the flow created by an under gravel filter). This allows for a better utilization of the available nutrients.
Substrate heating is also beneficial because for every 10 degrees higher temperature between 50 and 90 o F there is a 2-3 fold increase in the rate at which reduction reactions occur. This is important because iron and other nutrients are more soluble in their reduced state, that is, Fe++ is more available than Fe+++. With the extra heat in proximity to plant roots and the iron bearing laterite, optimum growing plants which would otherwise be Fe++ limited have a slow, but steady Fe++ source.
A third reason is that some plant books mention that having "warm roots" is beneficial to many plants, especially Barclaya longifolia. The heating cables provide a gentle source of warmth. We have noticed when planting the tank that the gravel really does feel warmer than the water.
We used 750 grams of Duplarit G laterite mixed with the bottom 1/3 of the gravel. With the laterite, Dupla supplies some "root starter" tablets that are also mixed with the gravel. We suspect these tablets are essentially house plant fertilizer containing an initial dose of nitrates and phosphates.
Once the laterite/gravel substrate was in place, the rest of the gravel was layered on top. We made no provisions for terracing the substrate. We have found that aquarium gravel has a very strong tendency to become level over time. Any visual layering will be accomplished with different sized plants.
Once the substrate was in place, we filled the tank with tap water at 80 degrees F. Our water is very soft, having a GH (general or calcium harness) of about 1.5 degrees (25 ppm) and a KH (carbonate hardness) of about 0.5 degrees (10 ppm). We like to keep our plant tanks at a GH of about 3 and a KH of about 4.5 to match the requirements of the plants, fish and pH buffering we desire.
Initially, we used appropriate amounts of Dupla KH and KH+GH tablets. These tablets are essentially sodium bicarbonate and calcium carbonate in a convenient to use form. We will probably create our own hardening "recipe" after our current supply of these tablets is exhausted.
When the KH+GH tablets are dissolved in water, they form a milky solution that is useful for determining water flow patterns. The solution was poured in the trickle filter sump and monitored as it was dispersed by the water currents.
Since the higher carbonate hardness in the tank raises the pH, we add CO2 to both lower the pH to the desired level and provide a carbon source for the plants. We add enough CO2 to maintain an initial pH of about 7.1. This is compatible with the needs of black mollies, which are used to break in the tank and provide algae control until the plants have established themselves.
The relationship of CO2, pH and KH is determined by the action of the carbonic acid generated when CO2 is added to water. At a fixed KH, adding or removing CO2 will lower or raise the pH accordingly (See Chapter 12: Water Chemistry). At a specific point in this relationship, the carbonate hardness provides a strong buffering capacity that prevents the pH from dropping as biological activity occurs.
This buffering is a result of the chemical properties of weak acids. When a weak acid dissociates in water, the ratio of the acid-base pairs formed has a logarithmic relationship. If you plot the acid-base ratio against pH, you would find that above or below a certain pH, the curve is very flat, i.e., as acids or bases are added to the solution, pH will change quite a bit. Around a certain pH, called the equilibrium point, the curve is nearly vertical, meaning that as acids or bases are added there is very little change in pH. Note that there can be more than one equilibrium point and they are different for every acid.
The relevant equilibrium point for carbonic acid is pH=6.37. This is ideal for planted aquaria since the desired pH is usually slightly above this point and the typical trend is for the pH to be lowered because of acids generated by biological processes. Since the starting pH is above the equilibrium point and any shift is toward it, a lot of acid can be "buffered" before the pH will fall below that point.
As another example, phosphate buffering is used in some commercial pH stabilizers. The important equilibrium point for dihydrogen orthophosphate is at pH=7.21. In this case, if the pH is at 7.0 and more acid is added, the pH will move away from the equilibrium point and will reduce the acid buffering capacity. Because of this, phosphates are a better buffer for an African Rift Lake cichlid tank, where the pH is usually higher. Also note that phosphates are a nutrinent required by algae, whereas carbonates are beneficial to plants.
There are four components that make up a plant's requirements for growth. The first is light, which is well provided for by the metal halide lights. The second is nitrogen and phosphorus compounds, which are provided by the waste products of the fish (and the "root starter" tablets). The third is carbon, which is provided by the CO2. The last is the proper trace elements, which in our case are provided by Dupla products.
Plant growth will be decided by the "Liebig Minimum Law", which states that growth will be limited by that component which has the lowest concentration. That is, if you have great light, lots of nitrates and phosphates (i.e., lots of fish), plenty of CO2 but few trace elements, the lack of trace elements, or even a single, specific trace element, will limit the plant growth.
We have tried many commercial fertilizers and have found the Dupla products to be the best for our conditions in terms of providing all the essential elements for fish and plant health. There are three components to the Dupla line. The first is Duplagan, which is used at water changes and adds organic acids beneficial to slime coat production on the fish. This product looks a little like water treated with peat and seems to contain essential vitamins and minerals.
The second is DuplaPlant tablets, which contain a large dose of iron and other trace elements and is also used when water is changed. DuplaPlant tablets supply those trace elements which are not toxic in large doses (enough to last between water changes) and which are stable enough to remain in the water until used by the plants. The predominant components are potassium, iron, sodium, manganese, boron, calcium and nickel.
The third component is DuplaPlant 24 "Daily drops", which contain mostly iron and some trace elements that are either toxic in large doses or are unstable. As the name implies, this is added daily in very small quantities (5 drops per day for the SST).
The initial iron levels are higher than we normally maintain due to the
laterite. After being set up, we measured 0.5 ppm of Fe in the water
before adding any other fertilizers. This should be used up fairly rapidly
by both the initial plant growth and by the nitrifying bacteria as
they develop. After one week, we measured 0.35 ppm. In the long run,
we will try to keep iron in the 0.1 to 0.15 ppm range.
Chapter 4 Plants
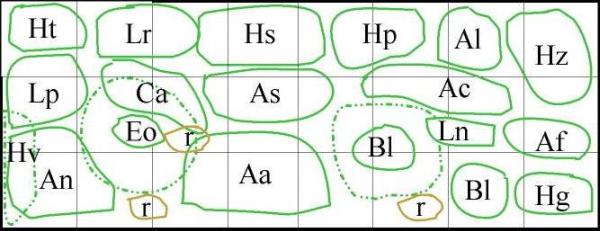
Plant List for the 90 gallon Super Show Tank
|
As Ammannia senegalensis Ab Anubias barcon Ac Anubias coffeeafolia Al Anubias lanceolata Ak Anubias kumbaensis An Anubias nana As Anubias sp. Aa Armoracea aquatica Bm Bacopa monniera Bl Barclaya longifolia |
Eo Echinodorus osiris Hz Heteranthera zosterifolia (floating) Hydrocotyle leucocephala Hv Hydrocotyle vulgaris Hp Hygrophila polysperma Hs Hygrophila salicifolia Lp Ludwigia palustris Lr Ludwigia repens Ns Nomaphila siamensis rr rocks |
Deciding on the plant selection for a densely planted tank is, at least for us, the most difficult and frustrating part of the whole process. We are not so naive to think that when European aquarists set up a new tank, they just draw out a pleasing "plant diagram", run down to the "plant store" and buy what they need. But surely they must have an easier time of it than North American enthusiasts. We have learned that we must buy what plants we can when they are available and then, over time, adjust the planting until it reaches a pleasing state.
Aquascaping the SST was no exception to this rule. We used a combination of mail order sources, local stores and cuttings from our other tanks to provide plant stock for the initial planting. We ordered some exotic new plants we had not tried before and we found some large specimen plants to act as center pieces. We ordered what seemed like far too many fast growing bunch plants. We selected some good looking cuttings from our other tanks to ensure there was strong plant growth from the start.
After all of our high expectations, planning and anticipation, the final result of the initial planting was very disappointing. With the exception of the cuttings from our own tanks, the new plants were pathetic. The bunch plants were barely alive, the "show" plants were bent and twisted from shipping and the tank looked almost empty! The following represents the initial planting for the SST. In some cases, there is some confusion of what plants we actually have.
The following are notes about each plant - the source, condition at the initial planting and condition after one week. All the plants came from mail order sources, except as noted.
Anubias spp. The larger plants arrived bent and folded from shipment but were in fair condition. As with most Anubias, dramatic growth has not been one of the distinguishing features, but the larger plants are straightening up and getting their leaves oriented in a somewhat natural looking posture.
Echinodorus spp. All but the 3 large E. cordifolius were mail ordered and also arrived bent and folded, but in fair condition. The large cordifolius were found in a Denver fish shop and are gorgeous (not bad for "3 for $10") . The osiris and horemanii are deep blood red in color. These are the reddest swords we have ever seen. We hope they maintain this color.
The E. tenellus was in pathetic condition (we call it "pygmy chain stumps"). It was mostly melted down when it arrived and has just recently shown some form of life with some runners and new leaves forming. We suspect that the plant shipment got very cold at some point and the smaller plants suffered greatly. We had paid an extra $5 for a styrofoam box but did not receive it. The plants came in newspaper and plastic bags.
Nymphaea lotus We received 1 "micro bulb" and 1 root with a few leaves attached. No sign of activity yet.
Alternanthera sessilis Like the tenellus, the A. sessilis apparently froze in shipment. The stems were translucent and mushy ("A. sessilis var gelatinous"). We thought we noticed some new leaves growing, but it's hard to tell. Hopefully, there is enough DNA left to get some starter plants. We have seen this in local stores as "dragon flame" or "scarlet hygro" and have had no luck in the past with it.
Armoracia aquatica This arrived in fair condition, but has shown no activity. It looks like a small head of romaine lettuce (not at all like the picture in the Barry James book). We figure it is in its emersed form and may change if it grows.
Bacopa spp. The B. caroliniana came from our Rainbow tank. We had intended to not use any of our own plants to avoid transferring any "starter" algae from the other tanks. When we saw how pathetic the new plants looked, we broke down and just had to get some healthy specimens in the tank.
The B. monnieri arrived as mostly stems with a few small leaves attached. It was so hard to tell what they were supposed to look like, we accidently planted half the stems up-side down! They are showing some growth at this point and should be nice detail plants.
Didiplis diandra This arrived as mostly brown leaves and stems. It is responding well to the tank conditions and has about 2" of new, green growth. We will probably try this in our other tanks as well, once it gets healthy. The Rainbows should find this a good spawning medium.
Heteranthera zosterifolia This arrived much like the D. diandra. It too is responding well and has put on 1" of bright green leaves.
Hydrocotyle leucocephala This arrived in fairly good condition and is growing well. We currently have a variety of this in our other tanks that grows like crazy. The old variety grows on long vertical runners with 1" round leaves on short stems and might be cardamine. This grows on shorter, stockier vertical runners and has 1" leaves on long stems (up to 6" so far). A very interesting plant.
"Sunset Hygro" We have seen this in local stores and has H. polysperma type leaves with a pink and white variegated pattern. When it arrived, it had mostly dead leaves but has grown very well and is now looking very healthy. I'm not sure if we really like the looks of the plant - we might move it to the 55 gallon tank to see how it does.
Ludwigia sp. The L. repens came from our AOA and is doing fine. The "green ludwigia" came from a local store and appears to be just a smaller leafed version of the repens. We wouldn't be surprised if it turns out to actually be L. repens.
Nomaphila sp. The N. siamensis looks like "temple plant" but the leaves are more oval than tapered. It appears to have been grown emersed and has grown 2 or 3 new leaves on each stem. The new leaves are the same as the old, just brighter green.
What came in as N. stricta appears to be N. salicifolia ("Willow Leaf Hygro"). We have had this before and it didn't do much (didn't grow or die, just collected some small tufts of red algae). It has grown some roots, so we'll see what happens.
Rotala sp. The "Magenta Rotala" was worse off than the A. sessilis and has pretty much disintegrated. Most of it has been swallowed by the skimmer, but the tops of two stems show some new growth. The R. macranda came from the Rainbow tank and is doing very well.
"foxtail" This came from a local store and was a brownish variety when we planted it. New growth has a more greenish tinge to it and it has grown about 2" since planting.
For the first three weeks, we watched for signs of growth, did a little pruning and removed any plants that died from the shock of shipping or transplanting. We were still disappointed at the appearance of the tank, thinking that the plants weren't growing as well as they should. Only after comparing photos of the initial planting to the three week's growth did we realize that, indeed, the plants were growing at a fabulous rate. Monitoring the tank growth day by day did not provide us with a frame of reference for how well it was doing. "A watched tank never grows"!
After four weeks, we were able to gauge how the plants would grow and were able to rearrange the plants to better provide for the lighting requirements of the various species. As we moved the plants, we noted surprising root growth. More importantly, we noticed that the roots have developed extremely fine root hairs which we have not seen to any great degree in our other tanks. This would seem to indicate that the laterite and heating coils are making more nutrients available to the roots. The proliferation of the root hairs is the plant's method for optimizing these conditions.
This tank is our tallest so far. We have had more trouble than expected in reaching our goals of having a densely planted aquarium and having tall plants growing out of the water. The two main reasons for this trouble are the physical size of the roots of some tall plants and problems with tall plants shading low growing plants requiring lots of light.
We initially selected some tall growing Anubias (barcon, afzelli, kumbaensis) to satisfy our desire for tall, elegant plants. They serve this purpose, but they also have huge rhizomes with lots of wiry roots. These have proven difficult to integrate into the dense planting scheme because of the large root mass.
Our fastest growing plant is Ludwigia repens. We gave this plant a dominant position in the tank based on our experience with it in the AOA. It quickly grows to the surface and produces a very striking effect. The problem in the SST is that this plant also tends to grow in the shape of an inverted pyramid. Thus, when it reaches the top of a tall tank, it also has a pretty good "wing spread" and tends to shade all of the lower growing plants. We have learned how to deal with these problems and now have enough experience with the plants we have selected to design a final plant arrangement for the Super Show Tank.
After six weeks, the tank has stabilized and we have recognized which plants will do well in this tank and which plants should be kept elsewhere. We have been able to locate other plant species that are of interest to us and developed a "final" planting scheme. This is final only in the sense that it is a longer term arrangement and will still change over time as we see other plants we like or realize that moving one plant or rearranging others will provide a more harmonious appearance.
In developing the final plan, we needed to balance the location of low growing plants and their requirements for varying degrees of light against the locations of the taller or faster growing plants. Even with this careful design, regular pruning is needed to keep the faster growing plants under control.
The tall Anubias (barcon, kumbaensis), the Nomaphila siamensis and Hygrophila salicifolia were placed in rear corners and along the sides of the tank. This keeps them from shading the lower plants in the front and provides some relatively open areas in the rear of the tank for fish to hide in if they get nervous. By not densely planting the corners, it also makes it easier to siphon up any detritus that collects in these areas. These plants have their leaves mostly towards the surface so they are not blocked from view by the plants in front.
Visual strong points are the thick clusters of Ludwigia repens, Heteranthera zosterifolia and Hygrophila polysperma. All three of these grow very quickly and provide the major textures of the aquascape. The H. zosterifolia is an especially striking plant with its bright green rosettes. A tall Echinodorus cordifolius visually separates it from the Ludwigia.
To fill in the shaded areas in front of the larger plants, low growing Cryptocoryne and Anubias plants are used. The C. affinis is positioned along the path of the lower water return on the left side and nicely defines the current flow. The A. lanceolata and A. coffeeafolia add interesting color and texture highlights in there areas of the tank.
A major focal point is the vertical color splash of the Rotala macrantha and Ammannia senegalensis. This offers a dramatic contrast to the plants around them and serves to divide the tank into two separate visual spaces. A lesser counterpoint to this is the small bunch of Bacopa monniera tucked in by the A. coffeeafolia. This and the R. macrantha forms a frame around the highly textured Anubias, providing a perfect setting for photographing fish.
The focal point of the left side of the tank is the Echinodorus osiris. Its large dark red leaves contrast nicely with the H. zosterifolia behind it and the A. nana in front of it. A large Thai lotus (Nymphea stellata) provides a horizontal accent to the vertical orientation of the sword plant.
A group of bright green Armoracea aquatica provides a detail point in the right front of the tank. To provide a dynamic feeling to the tank, a small clump of fine-leaved Ludwigia is used to move the observer's eye toward a line of Lilaeopsis oriented back towards the H. zosterifolia.
A final accent is a section of Hydrocotyle leucocephala floating on the top. We tried to plant one end of it, but it kept pulling itself out of the gravel. It has large water roots and lily-pad like leaves and seems perfectly happy just floating over the left side of the tank. It is a lovely green and looks very appealing from above. It is a fast grower that we keep under control by merely cutting a few inches off the end every few days.
We are quite happy with the overall appearance of the Super Show
Tank at this point. The first three weeks were agony, but the results
were well worth the wait. Once the smaller foreground plants begin to
spread and fill in around the bottom, the aquarium will truly be a thing
of beauty.
Chapter 5 Fish
Hardy algae-eating fish were used to seed the biological filter and to keep in check any algae growth during this unstable break-in period of the tank. Ten veil-tail black mollies were added initially and not fed for three weeks. Black mollies are good consumers of almost all kinds of algae providing they are not spoiled with other kinds of food.
After one week we were able to find a true "Siamese Algae Eater" (Crossocheilus siamensis) which is supposed to be one of the best consumers of hair algae. This fish is very similar to the true "Flying Fox" (Epalzeorhynchus kallopterus) and is often sold by the same name. The true Flying Fox, however, becomes more territorial and aggressive than the C. siamensis and supposedly doesn't eat hair algae. The main differentiating factor between the two fish is coloring on the body and fins. The true Flying Fox has a very definite black and gold stripe down the sides and much more color in the dorsal fin. The C. siamensis has a diffuse black side stripe and clear fins.
We have had experience with other types of algae-eating fish in our previous aquariums. Otocinclus vittatus is a popular and readily available algae-eater. However, despite the industrious habits of this little fish, one or two in a large tank will not consume enough algae to be really useful. We have 12 Otocinclus in the SST.
Another popular algae-eating fish is the Bristle-nose Plecostomus (Ancistrus dolichopterus). In our experience this fish is a good algae consumer, but it can also wreak havoc with Amazon sword plants. Perhaps if they are provided with a piece of resinous wood to meet their desire for cellulose this species would be okay in a plant tank. Our 100-gallon discus tank has a pair of Farlowella acus for algae-eating. These appear to be good algae eaters but are not as industrious as mollies. In addition, these fish are a much more delicate species to maintain than mollies.
Besides algae-eaters, the aquarium needs scavenger fish to pick up the leftover food which drops to the bottom. We added six Corydoras trilineatus (often sold as C. julii) to fulfill this function. The C. trilineatus have always been our favorite because of the bright silver and black pattern. Since these fish seem to appear more relaxed and are more active in a school, we purchased a group of six.
The other members of the housekeeping staff are Malaysian trumpet snails (Melanoides tubercularia). Many people feel that snails can be a disaster in a plant tank, but, as far as we can tell, this type does not harm plants. These snails burrow in the gravel by day, helping to aerate it. They appear at night (and after we feed the fish) to eat food scraps and detritus. In addition, if the snails are no longer living in the gravel, but are seen crawling on the top all the time, this probably means that the gravel needs some cleaning.
The Malaysian snails are live bearers and can reproduce at prodigious rates but a large population still doesn't seem to be destructive. The snails run free in the AOA and must number in the tens of thousands even though they are mostly invisible. When the canister filter or the trickle filter pads are cleaned, we will wash out thousands of juveniles. The young ones must have a poor survival rate, since we never see more than a couple of dozen adults at any one time. If an unchecked population of these snails proves to be a problem, Clown Loaches (Botia macracanthus) are very effective at keeping these and other snails under control. Clown Loaches would work well in the SST since they can tolerate higher temperatures.
We "seeded" the SST with 4 large (3/4") snails from the AOA. After a few weeks, we can already see quite a few cruising in and out of the gravel and munching on detritus.
In our 100-gallon discus tank, we have Cardinal Tetras (Paracheirodon axelrodi) to complement the discus. Since we wanted the SST to be different, we began to look around for other suitable fish. They had to be mild-mannered, non-plant eating, warm-water loving and able to live in soft water. In addition, the fish had to be non-aggressive in their eating habits, so as to not out compete the discus which love to leisurely eat their food from the bottom. As it turned out Butterfly Rams (Papiliochromis ramirezi) were the perfect solution. They can be shy fish, but in a planted tank, they appear to be very confident and take on beautiful coloration. In recent years it has become difficult to find the original wild-type of Ram since it appears that breeders have been selecting for long fins. We finally did find six Butterfly Rams and four of the gold variation which had normal finnage.
Rams tend to swim in the bottom third of the tank. We thought it would be nice to have some fish that would occupy the upper part of the tank. Again we looked for mild mannered fish. One of our favorites has always been Pearl Gouramis (Trichogaster leeri). We bought two pairs at the local fish store. They are juveniles but have quite a bit of color. They've only been in the tank for a few days and are already quite happy and eating well. It's also fun to watch the pearls use their long pelvic fins to get to know the other fish and the plants. The discus don't seem to be upset at all by the behavior of the gouramis.
The stars of the Super Show Tank will be discus. The first two members were called "wild blue discus" at the fish store, but to us they appear to be Symphysodon aequifasciatus or green discus. We love the beautiful gold bodies and red spots on the body and ventral fins, and the deep red eyes. The other discus will be moved from the 100-gallon tank. These include a "German Brilliant Turquoise" and a "Striated Red" from Dr. Kenneth Reeves, a breeder in Denver. These fish have been spawning recently and have actually raised some fry in the community tank.
How much to feed your fish is always a controversial topic, especially in a heavily planted tank. A true "Dutch" tank has very few fish and they are not fed very much. This keeps nitrate and phosphates at low levels, preventing much algae from growing. This also reduces the need for large water changes and the potential disruption of water chemistry. A light feeding schedule is also beneficial since it is difficult to remove detritus in a heavily planted tank.
On the other hand, fish breeders like to provide a lot of food for the fish, optimizing their growth. This usually requires bare tanks so that uneaten food and fish wastes can be easily removed before they can affect water quality. This is especially important for discus, since they should be fed heavily to achieve good size and to get into breeding condition and they are extremely sensitive to good water quality.
The Super Show Tank is obviously a compromise. We would like to provide a good environment for the discus, requiring both lots of food and good water quality. At the same time we want a heavily planted tank, making it difficult to provide the "sterile" conditions that would be optimum. The compromise is to provide an adequate amount of food and to be diligent in making sure the detritus is kept to a minimum by carefully controlling the amount of food, providing scavengers to consume any food not eaten by the fish, maintaining a weekly water change cycle and monitoring water quality (nitrates and phosphates).
Besides the amount of food given, the type of food is very important. We believe that a varied diet is better for the fish than to simply try to provide a single all-around food. We alternate between frozen cubes, dry food and live food (when available).
For frozen food, we like the Ocean Nutrition "Formula One" cubes. We have tried other styles of this brand and found these to be the favorite of the fish, although the Rainbowfish seem to like "Prime Reef" as an occasional treat. Some of the cubes tend to float, especially the Freshwater Formula cubes that were introduced recently. This can be a problem when you have a skimmer in the tank - you end up feeding the trickle filter and not the fish. Discus also prefer to eat off the bottom and don't respond well to floating food. To augment the cubes, they are squirted with some Ocean Nutrition Vit-a-Boost vitamin supplement as they are defrosting.
Frozen cubes are usually fed at night as the main meal of the day. With the fish load we have in the SST, we are feeding one and one-half cubes per night. The two discus can usually eat one cube and the rams will pick over the half cube. Any scraps are consumed by the corys and snails.
There are two types of dry food our fish seem to prefer. TetraMin Staple Food (large flakes) and TetraBits are fed on alternate mornings before the lights come on. To avoid having the flakes removed by the skimmer, they are first soaked in a small dish for a few seconds, allowing them to immediately sink when they are poured in the tank.
We try to provide some live food twice a month for the fish. Our local
stores don't carry any live food, limiting how much we can get. We will
purchase a few portions of brine shrimp whenever we get a chance to
get to a store that carries them and will feed the fish exclusively on
them until the shrimp are gone. We have avoided tubifex worms
because of their bad reputation. Other types of live food are not
available in our area and we haven't yet delved into the realm of growing our
own.
Chapter 6 Maintenance
We are doing weekly partial water changes of 100 liters (1/3 the water volume). For the water change, we turn off the trickle filter and let water run back into it until its siphon breaks. We then attach a homemade plastic gauge marked in 25 liter increments to mark the aquarium water level. The gauge is calibrated in liters, since the Dupla additives are all dosed in terms of liters of water. This allows us to change exactly 100 liters and refill the tank to the correct level.
Before we drain any water, the pH and ORP electrodes are moved to the skimmer box so that they can remain submersed in water. If they become dry, it shortens their useful life and requires some time to equilibrate after they are put back in the water.
A Python "No Spill" gravel cleaner is used to drain the water to the outside house shrubbery. The top of the gravel in and around plants is lightly suctioned to remove excess detritus. Since there is no under gravel filter, debris is not pulled into the gravel and it is much easier to clean.
After draining, the Python is attached to the kitchen faucet for refilling. We stuck a small Second Nature liquid crystal thermometer permanently on the faucet, which allows us to set the temperature at the faucet without running back and forth to the tank to feel the temperature of the water. This is a very useful thermometer because it has a moving line to indicate the temperature rather than numbers in different colors which hard to interpret. It is also very accurate and responds to water temperature changes quickly since it stuck on the metal faucet.
The recommended amount (50 ml) of Duplagan water conditioner is added to the tank before refilling commences. Prior to refilling, we run the tap water for a minute to make sure there is no dissolved copper in it from the plumbing. We use the water directly from the faucet and do not use any dechlorinator. Any chlorine in the water apparently does no harm to the fish, as the discus in the AOA show no ill effects and one of the pairs is currently raising a small group of fry in the tank. We know that our tap water contains only gaseous chlorine and no chloramines. We think the low levels of chlorine in our tap water may act as a mild anti-bacterial agent and help maintain a healthy tank.
One Duplaplant tablet is added to the pre-filter box of the trickle filter. This is one-half the recommended dose, but based on experience, provides the correct levels or iron. Adding the tablet to the skimmer box lets it slowly dissolve and get dispersed evenly throughout the tank and prevents the fish from trying to nibble on it. The tablet adds enough trace elements to nourish the plants until the next water change. Also, enough iron is added to last for 2 days before Duplaplant 24 drops are used.
Since our tap water is very soft, we must add some hardeners at each water change to maintain our desired carbonate hardness (KH) and general hardness (GH). One teaspoon (about 6 grams) of sodium bicarbonate (NaHCO3) per 50 liters of water will increase KH by 4 degrees and will not increase general hardness. Two teaspoons (about 4 grams) of calcium carbonate (CaCO3) per 50 liters of water will increase both KH and GH by 4 degrees. Different proportions of each can be used to get the correct KH/GH balance dictated by the fish and plants in the tank. Since it is difficult to accurately measure small quantities of dry chemicals at home, a test kit should be used to verify the actual KH and GH that is achieved.
We use ACS (American Chemical Society) grade chemicals bought in bulk from Hach Chemical to ensure that there are no contaminants added to the water. After a water change in the SST (100 liters), we add 1 teaspoon of sodium bicarbonate and 2 teaspoons of calcium carbonate to maintain the KH at 4.5 and the GH at 3.0. The hardeners are also added to the prefilter to prevent the fish from trying to eat them.
During the weekly water change, plants are trimmed if necessary, and any dead or dying leaves are removed. The slots of the skimmer box are scrubbed with a small brush to remove any algae build up that would prevent full water flow. The inside walls of the tank are scrubbed to remove film and any algae spots. Filter pads in the trickle filter are checked and changed if needed.
During the initial break-in period, the ammonia and nitrite levels were monitored closely. No sharp peaks were seen in either parameter, because the fish load was light and the fish were only eating algae. After three weeks fish other than algae-eaters were added slowly and ammonia and nitrite levels were monitored. Nitrate levels are monitored to determine if the partial water changes are sufficient to keep a low nitrate level so as to not encourage excess algae growth. Through water changes and careful feeding, we strive to maintain nitrate levels less than 10 ppm. Currently, the AOA runs between 4 and 8 ppm of nitrate.
Phosphate levels are monitored periodically for the same reason and also to give us an idea if we are overfeeding the fish. Phosphate levels are kept below 0.1 ppm.
With the Sandpoint II controller and a solenoid valve, manual CO2 and pH checks are kept to a minimum. As for hardness, first we established how much calcium carbonate and sodium bicarbonate were required with each water change to maintain a general hardness of 3 degrees and a carbonate hardness of 4.5 degrees in the tank. KH and GH are monitored periodically to determine that nothing substantial has changed in our water supply. As long as the KH is constant, CO2 will be injected automatically to maintain the set pH of 6.9.
With the top of the aquarium open, evaporation is a concern, especially in our low humidity climate. We find that about one and one-half gallons of water evaporates per day. With a trickle filter, the water level in the tank remains constant and the loss of water is accounted for in the filter sump. Since the filter is fairly small, we must make up for the water loss daily or the pump will run dry.
To indicate how much water is needed, a piece of white plastic tape is affixed to the side of the filter and is marked in gallons. "0" is at the low water mark (just before the pump will start a small vortex and begin sucking air) and 3 gallons are as much as we want to add to prevent the bio-media from being submerged. We try to keep the level between 1 and 2.5 gallons above the low water mark. Two 1 gallon plastic jugs are kept filled with water (aged overnight) with which to refill the tank. The water is added directly to the tank without additional treatment.
The polyester pads wrapped around the prefilter sponge and on top of the drip plate are replaced with clean ones on a regular basis. Dirty filter pads will reduce the water flow in the system, reducing the filter efficiency. Pads clogged with decomposing debris will also contribute to higher nitrates. The ORP reading is a good indication of filter condition - the value starts to drop when the pads are dirty enough to affect the water quality.
The pad wrapped around the prefilter sponge is changed twice a week. This collects the most debris, usually dead leaves and food particles. The drip plate pad is changed once per week, usually during a water change. The dirty pads are rinsed with water and then soaked in a 20% bleach solution overnight. The following day they are rinsed extensively and dried before reuse. We have a good supply of filter pads that are rotated on a continuous basis.
The quality and intensity of light in a planted tank is very important. To maintain the best light possible, bulbs are changed on a regular basis. Most sources state that the useful life of a fluorescent bulb is about 6 months. After this point, the intensity has degraded to about 70% of its initial value. We mark all our bulbs with the date they are first used and change them 6 months after that date. We make sure to not change all the bulbs at once, since if all the bulbs were on the same cycle, the tank would be starving for light at the end of a six month period. One bulb is changed roughly every 2 months, giving us a high average intensity.
Metal halide bulbs are much longer lived than fluorescent bulbs, which is a good thing since they are quite a bit more expensive. Most sources say that 12-18 months is the expected useful life of a MH bulb. We will check ours periodically with a lux meter to determine when it is time for a new bulb. Initially, the MH bulbs provide 75,000 Lux at the bottom of the light fixture, 15,000 Lux at the water surface and 1400 Lux 4" above the gravel.
Approximately every two months the pH and ORP electrodes are removed for an extensive cleaning according to the manufacturers directions. Between times the electrodes are just cleaned of algae if necessary. The probe used on the pH controller must be calibrated periodically to maintain its accuracy. This a fairly simple half hour procedure that we do every two months or so. The probe does wear out, so it also must be replaced about every 18 months or when the readings become erratic or it is difficult to calibrate. Since the pH controller is a critical part of the aquarium system, we keep a spare probe around in case we should accidently break the one in use.
There are no adjustments on the temperature controller, but we do
check it against a lab thermometer, just in case.
Chapter 7 Initial Conclusions
After 6 weeks, the Super Show Tank is beginning to meet our expectations. Most of the plants have really begun to grow quickly and are filling in the open areas of the aquarium. Water quality is very good and all conditions are stable.
Even though the plants have not yet reached their full growth potential the tank has exceeded our initial goals. The "open top" look is really very impressive and, as a side benefit, promotes casual maintenance by giving easy access to the tank. It is very easy to reach in and pluck the occasional dead leaf from the filter inlet or from the gravel. The convenient electrical controls also make the tank a pleasure to work in.
We have experienced no problems with the tank. The typical new tank syndromes of cloudy water and ammonia and nitrite spikes either didn't occur or were very minor. Even though the lower 1/3 of the substrate has finely powdered laterite mixed with it, none was visible in the water the day after the tank was set up. The water was crystal clear within three days. We noticed an ammonia spike around two weeks after starting the tank, but it was very minor (< 0.02 ppm). A nitrite spike was noticed one week later, but was correspondingly small, presenting no danger to the fish.
We do not attribute the above results to luck, but to our aggressive and careful control of all the tank parameters. Nothing is left to chance and our initial results with the SST and continuing success with our other tanks reflect that. We feel that this attention to detail is what separates aquarists who have consistently good results with plants and fish from those who can only sporadically enjoy such success.
The SST is not a carefully groomed floral arrangement like Dutch tanks, but is a working ecosystem supporting both fish and plants. A tank that is predominately plants is nice to look at, but we feel the activities of the fish add quite a bit more interest. The Rams have selected territories around the bases of some of the plants and are showing signs of mating activity. The Discus acclimated quickly to the new surroundings are very friendly and outgoing, displaying typical cichlid "feed me" behavior when we are near the tank and love to eat food from our hands.
We are looking forward to the near future when the plants have fully
matured and provide the proper background and environment for the
fish we so enjoy.
Chapter 8 Update at 4 Months
The Super Show tank has been set up and operating for 4 months. The following is an update on how the hardware is working and how the plants are responding. This is organized in the same manner as the previous 7 Chapter s to give a sense of continuity.
We are very happy with the open top style of tank. The view from above with the floating and emersed leaves really is exceptional. Casual maintenance is greatly facilitated, especially removing leaves caught in the skimmer and floating on top. The pre-filter pad is easy to remove for cleaning and feeding is a snap. It's too bad our other tanks are acrylic - the top plates would not be very attractive if they weren't covered by a hood.
The only drawback is glare from the suspended metal halide light. You can't actually see the bulbs, just the bright white reflector inside the fixture. To counter it, I wear a baseball cap when I sit in front of the tank. I might look into making a smoked plexiglass border around the edge of the fixture, just large enough to block the glare.
Tank and Stand We're very happy with the tank and stand. Algae is easy to remove from the glass with a razor blade. With the acrylic tanks, a soft pad and a lot of elbow grease are required. We've gotten used to the distortion the thick glass causes at oblique angles. The stand hasn't collapsed, so what else can you say?
Electrical We still like the "control panel" (switches for pumps, cabinet lights, etc.). We've had no trouble with the GFI (although we will probably bypass it when we go on vacation to avoid any spurious tripping).
Lighting We really like the metal halide lights. The intensity and color rendition are excellent. Having "point sources" allows any surface ripples to cast natural looking shadows on the plants and gravel, mimicking sun light. We've adjusted the "siphon breaker" holes in the trickle filter water returns to produce just the right amount of ripples to enhance the effect.
We did experience infant mortality with one of the two bulbs at about 3 months. Hamilton warranties them for a year, so it was replaced "free of charge". Of course, we had to pay shipping to return the old bulb (so they could verify it was broken) and to send the new bulb to us, but I guess you can't consider that a "charge". Funny how it cost $2.40 for me to ship it to them, but it costs $7.90 for them to ship it to me. Must be a California export tax or something.
When we put the new bulb in, we compared its lux value against the older bulb and tracked its brightness over time with our Lux Meter. The initial loss was quite dramatic going from 20,000 lux at the water surface to 15,000 lux within a month. The bottom of the aquarium receives between 1000 to 4000 lux depending on shading from above.
Heating The heating coils are working fine as far as we can tell. We have noticed that they can't quite maintain 82o F on colder nights and are going to reinstall the Ebo-Jaeger auxiliary heater.
My hypothesis about the coils not keeping the tank warm enough at night is that they do not provide enough heat to quickly raise the water temperature. The metal halide lights will heat the water to 82.5o F after they are on all day. This causes the temperature controller to turn off the coils sometime before the lights go off. When the coils are off for a while, the gravel will loose heat to the water and the glass bottom of the tank. Once the coils come back on, they slowly reheat the glass and gravel, but it takes so long that the temperature of the water continues to fall for awhile, then very slowly comes back to the correct level. The controller does not compensate for this large delay or lag. Maybe the new microprocessor controlled version does, but we'll never know because of the expense.
Filtration The water quality in the tank is excellent (nitrates, phosphates, O2, ORP, pH, etc.). Whether the good quality is due to the technology (substrate heating coils, Dupla BioKascade media, metal halide lights), due to the excellent plant growth (because of heating coils and MH lights) or simply because we clean the two filter pads more often is up for debate.
Nitrates in this tank are less than 3 ppm. The 100g tank runs 8-12 ppm with the equivalent bioload, the same trickle filter (with generic bioballs) but with an Eheim 2217 that doesn't get cleaned as much as it should. Since the trickle filter pads are the only mechanical filtration, we need to change the prefilter pad about twice a week and the drip plate pad about once a week. We are actually changing less water in the SST than in the other two tanks (100 liters versus 150 liters) and are getting lower nitrates. We are planning on removing the Eheim from the 100g tank for a while to see if long term detritus decay is causing the higher nitrates.
CO2 Injection Working great. Wouldn't be without it. We have a 20 pound tank on the system, which should last for about 6 months (and actually lasted 11 months).
Substrate The gravel/laterite combination is working fine. We can see the bottom of the gravel through the bottom of the stand and there are just a few roots from the E. osiris actually getting down that far (3.5" of gravel). When we move plants, none of the laterite is disturbed and there is no cloudiness. We have not noticed any large pockets of mulm when we gravel vacuum what gravel we can reach. There is also no visible mulm on the surface of the gravel. As far as we can tell, there are no anaerobic areas at the bottom of the gravel (black areas), so the heating coils must be creating enough oxygen circulation.
Hardness KH is kept around 4 degrees and GH around 3.5 degrees by adding sodium bicarbonate and calcium carbonate. This has worked out very well and is about 1/3 the cost of Dupla KH+GH tablets.
pH The pH is maintained at 6.80 +/- 0.05 by the CO2 controller.
Fertilization We are adding Duplagan water conditioner and Duplaplant fertilizer tablets at each weekly water change and 5 Duplaplant-24 trace element drops each day. Iron is steady at 0.15 ppm and the plants are growing like gangbusters.
Since the last update, we have slightly rearranged the tank and removed a few plants that didn't like the conditions or didn't contribute to the overall aesthetic. The E. cordifolius was too big and distracting; it would do better as a centerpiece in a less densely planted tank. The various crypts did not seem to like "warm roots" and weren't really needed anyway. The lotus bulb was in the same category - it's now in the 100g tank. The Rotala macrandra was also removed since it detracted from the A. senegalensis (same color and general appearance, just smaller). The new arrangement still provides the same feeling as the last one, but looks much less busy and more integrated (i.e., the plants seem to complement each other better).
The Echinodorus osiris has become a monster and is definitely the centerpiece of the tank (although placed correctly off-center to follow the "Golden Rule"). It is still producing about 1 new leaf per week, but the new leaves are now 4" wide, 8" long and are on 12" petioles (for the dimensionally challenged, the top of the leaf is at the water surface in a 24" deep tank). The new leaves are a deep burgundy color that gradually changes to a dark green over time.
We finally got some Barclaya longifolia bulbs and have had them for about 2 months. One is sort of a dud and has produced about 8-10 smallish, 2" long green leaves. The other is another story. It started very slowly and after 3 weeks or so produced a couple of leaves about 1"x6" that looked just like the pictures. Since then, it has decided it likes us and currently has at least 20 1"x10" leaves with two or three new leaves per week. The leaves are on short petioles, unlike pictures in the Rataj book (due to the bright lighting, no doubt). There are 6 flower stalks at this time, ranging from an 18" stalk with a flower blooming on the surface of the water to a 9", 6", 2", 1" and a 1/2" stalk just starting out. This plant is very impressive. What started out as a little 3/8" diameter bulb now has a golf ball size rhizome. We like it.
The Ammania senegalensis grows fairly fast but only slowly forms new branches that we can replant. We now have two stems with some new shoots starting on the second stem. This also is an impressive plant. It looks a lot like Rotala macrandra, but scaled up about three or four times. It has a 1/4" dia. stem with thin, 3-4" red-orange leaves growing opposed every 1/2" along the stem.
The Armoracea aquatica has divided into 6 or 7 plants and makes a beautiful green carpet about 2" high in the middle of the tank. It is being used to visually separate the E. osiris and B. longifolia and provide a foreground for the A. senegalensis. This is an outstanding foreground plant if you can find it, gorgeous emerald green with fountain shaped leaves growing out of a small base. They don't cover the gravel like E. tenellus, so scavengers and other fish can still get to food lodged underneath them.
The Heteranthera zosterifolia has taken on the characteristics of a weed. We need to cut about 2/3 of the mass away every two weeks or it will over take the tank. That's OK, though, since the local fish shop buys the excess from us and it seems to die for everyone else so there is a constant demand. When it's properly trimmed, the bright green rosettes are an exceptional background.
We have not experienced any algae plagues in this tank. We do have a wonderful variety of green algae, but they are easy to keep under control.
The various algae eaters keep the short little hair algae trimmed back, so that is no problem. Medium and long hair algae can be found among some of the plants, but is easily removed with a toothbrush by winding it up like spaghetti. A word of warning: Karla objected to the taste of the algae in the strongest possible terms, so I wouldn't recommend using your Significant Others's toothbrush.
Just like our other tanks, older leaves, especially Anubias, collect red brush algae (small, grey-black tufts). Since the plants grow very fast, we simply remove any leaves so affected.
This tank has produced a tough strain of "green dot" algae, probably due to the high light intensity. Our other tanks will get little green dots on the front plastic that takes a lot of rubbing to remove. In this tank, it grows in slightly larger patches on older leaves of some of the plants like the Anubias, Amoracea and the E. osiris. It doesn't seem to be a problem unless you look real close and believe that there should not be any algae. We think that algae is a natural result of a healthy plant tank, so we don't have a problem with it. At this point, we consider the plants in the tank mature and the arrangement pretty much stabilized. Now it's time to sit back and enjoy our efforts and perform the biweekly harvests.
We now have five discus in the tank, two wild type and three flavors of turquoise. The wild type ("Axel" and "Tefe") were in the tank for about two months before the three others ("Lo Fat", "Jake" and "Elwood") were transferred from the 100g tank, so they are the dominant ones. We don't expect any kind of courting activity for a year or so. "Lo Fat" was being picked on in the other tank and looks kinda sickly; we hope he perks up in this tank. He was purchased locally and was supposed to be a Lo Wing Yat ("Sunny") Full Color Turquoise direct from Hong Kong.
Note: we don't know how to identify dwarf cichlids, so you'll have to bear with our "fish store" nomenclature for the rams described below.
Of the 16 rams we purchased, five are still around. We originally had four "gold" rams and six "butterfly" rams from the usual stock that is typically found laying on the bottom of fish store tanks (you know, the long-finned mutants that are so genetically in-bred that they don't survive long?). We found some with normal finnage, but all have gone the way of the dinosaur. The last one we saw alive looked like a swimming head. We would have put it out of its misery, but it is impossible to catch fish in a densely planted tank, so we have to let nature take its nasty course.
Shortly after buying the initial 10, we found six more "wild" rams at a local store that weren't quite as colorful and had a more oval shape than the first rams. Of those, five are still alive and kicking. These may be genetically closer to a true wild ram, since they actually act like cichlids and not some kind of French Poodle that only eats "Gourmet Doggie Woggie Filet Mignon" in a can. They eat anything offered. They watch for us and wiggle for food. They have gotten much more colorful and appear to be courting. There is one large dominant fish, a couple of smaller fish that have staked out territory under the A. lanceolota, and two left-overs. They could be spawning, but we'll probably never know.
Mr. and Mrs. and Mr. and Mrs. Pearl Gourami are doing fine and getting beautiful coloration. We thought the natural color of the MH lights would not show them up as well as typical aquarium lights, but we were wrong. We were also wrong about them being "upper half of the tank" fish - they are where ever the food is! Of the 12 otocinclus we bought, we have only seen at two the same time recently. Either they hide well or they have been sucked into the skimmer box. Since we have actually found two or three slowly dissolving in the skimmer box, the latter is the preferred hypothesis.
Of the six Corydora trilineata we purchased, I have seen four at once recently, so they are probably still around. Also, the E. siamensis (Siamese Algae Eater) is still happily grazing algae bits off the various plants.
So, the big question - was the SST worth the $3500 (very conservative estimate) that we paid for it? Yes.
I don't think that expensive technology is required to grow plants (I can hear more than a few heads nodding out there). If you see the photos, you will realize that the 85 gallon Rainbowfish tank has the most impressive vegetation and it is very low tech except for CO2; it even has an UGF!
The cost of the SST was worth it to us because (1) we had the money available to do it and (B) we now have a range of technologies with which to experiment. We may find that, long term, the technology DOES make a difference; we are seeing very low nitrates in the tank for an as yet undetermined reason. We may find that the technology allows a tank to "work" for a much longer period of time between teardowns. But, that will take years to tell.
And, best of all, we will not be second guessing ourselves forever, saying
"If only we had tried heating coils".
Chapter 9 Update at 1 1/2 Years -
Comparing Technologies
Reading (and rereading many times) "The Optimum Aquarium" (TOA) led us to understand the principles that took us from the "luck" category of planted aquariums. We are the first to say that the book is hard to read and is a blatant sales pitch for the Dupla products. It takes some independent research and experience before you catch on to what Horst and Kipper are talking about. They (or the translator, Albert Theil) left out some key connections about the concepts behind an optimum aquarium that puts it in an understandable form.
Some people complain about the "10 Golden Rules for the Optimum Aquarium" presented in the book, especially since each of the 10 rules has some Dupla products associated with them. Some folks say "There are only three [or four or five] rules for fishkeeping". TOA rules are mostly common-sense things that everyone does anyway, with only two that go beyond standard practice - CO2 injection and substrate heating. Granted, Dupla has products, usually very expensive products, that optimize the application of the 10 rules, but most of the stuff can be purchased or home built with some understanding of the basic principles.
We are fortunate to have four different plant tanks; 55 gallon, 85g, 90g and 100g. We have set up each tank with differing equipment so we can "compare and contrast" the effects of the equipment and technologies involved.
The 55 gallon tank is the base level and is set up pretty much the way 80% of U.S. aquariums are set up. It's a standard 55 gallon glass tank with an under gravel filter (UGF) run by two Hagen 201 powerheads. The UGF is supplemented by an Eheim 2213 canister filter with various "efie-things" inside. An Eheim "Surface Extractor" is the input to the canister and removes the oily protein scum that tends to form on the surface of freshwater tanks. A pair of Ebo-Jaeger 75w heaters keeps the water at 78o F. A Sears shop light with a 40 watt Triton and Penn-Plax Ultra Tri-Lux provide light. The light is on 11 hours per day. Around 2.5" of 1/16-1/8" quartz gravel is used. Some laterite balls are placed around the base of some of the plants. No CO2 injection is used.
Fifty percent of the water is changed every 14 days. Duplagan water conditioner is used at water changes along with DuplaPlant tablets. One DuplaPlant-24 drop is added daily, starting 3 days after a water change. We add 0.5 teaspoon each of CaSO4, MgSO4 and CaCO3 to the water to increase GH and KH. The pH of the tank stays around 7.0, KH=1 degree, GH=3.5 degrees.
The tank has 4 adult Rainbowfish (4-6"), 5 juvenile Rainbowfish (1-2"), 1 large angelfish, 1 clown loach, 1 unidentified "pleco" and 3 corydoras. There is 1 large E. bleheri, a few stems of Hygrophila polysperma, some ambulia, and 3 or 4 varieties of crypts. Nothing does very well except for the crypts. They seem to like this tank better than most of the others.
We had an outbreak of blue-green slime algae last summer that was cured with Maracyn. We get a greasy, dark grey algae growing in little smears on the front glass (removed during water changes). The plants don't grow very fast, making this tank relatively maintenance free. We vacuum the gravel as much as possible since the UGF collects a lot of crud.
This tank is pretty boring. We often think about taking it down and selling it to avoid the extra half hour on water changing day.
We bought the 85g tank 5 years ago and was our first aquarium since we moved to Colorado in 1977. We had tanks during college (`70-'74) and while living in LA (`74-'77), but never tried to grow plants beyond an occasional "Wonder Bulb" (aponogeton). We struggled with the 85 until we discovered TOA. The difference was CO2 injection.
The 85 gallon acrylic tank is the next level of technology by virtue of a manual CO2 injection system. Like the 55g, it has an UGF with powerheads and an Ehiem 2217 canister with a Surface Extractor. Two Ebo-Jaeger 100w heater keeps the water at 76o F. A pair of Sears shop lights in a custom hood holding two 40 watt Triton, one 40 watt Penn-Plax Ultra Tri-Lux and one Coralife Trichromatic provide light. The light is on 11 hours per day. Around 2.5" of 1/16-1/8" quartz gravel is used. Some laterite balls are placed around the base of some of the plants.
The CO2 system started as a Dupla "Starter Kit" but has been upgraded with a 5 pound bottle and a commercial regulator. The CO2 goes through a Dupla bubble counter then into the inlet strainer of the canister filter. In general, we would not recommend the Dupla starter kit. The Dupla bubble counter is very useful, but the other parts of the system are much cheaper if you Do-It-Yourself.
Fifty percent of the water is changed every 14 days. Duplagan water conditioner is used at water changes along with DuplaPlant tablets. Four DuplaPlant-24 drops are added daily, starting 3 days after a water change. We add calcium carbonate to set the GH and KH at desired levels. The pH of the tank stays around 7.0, KH=4 degrees, GH=4.5 degrees, CO2=15 ppm.
The tank has 10 adult Rainbowfish (4-6"), 1 unidentified "pleco", 4 corydoras, 1 Farlowella and 6 Otocinclus. There is 1 large E. hormanii, large clumps of Rotala macrandra, Bacopa caroliniana, Ludwigia sp., a dozen or so Samolus parviflorus and Amoracea aquatica, a large Java fern, a clump of Java moss, various Anubias, a clump of Hydrocotyle leucocephala, 6 stems of Nomaphila stricta and a few crypts.
About the only substantial difference between this tank and the 55g is the CO2 injection. The difference in plant growth is amazing. The difference in appearance is amazing. We trim plants at every water change and put cuttings in the 55g and sell the rest to the local store.
The drawbacks to this tank are the UGF and the manual CO2 system. The tank will exhibit long term cycles of looking great and going downhill. The downhill periods are usually turned around with a thorough gravel vacuuming. We also see a long term drift in pH due to the manual CO2 system. It runs continuously and it is hard to get just the right bubble rate to offset CO2 outgassing. We don't see more than 0.2 pH units difference between daytime when the plants are using CO2 and producing O2 and nighttime when they are using O2 and producing CO2. There is a 10 ppm difference in CO2, but the 4 degrees of KH keeps the pH fairly stable.
This tank clearly refutes the myth that under gravel filtration per se is bad for plants. The plants thrive in this tank. In our opinion, what is bad for plants is excess decomposing crud building up in the gravel.
Unfortunately, UGF tend to pull crud into the gravel and people tend to not clean the gravel as much as they should, creating poor conditions for plants. When properly configured and maintained, an UGF will work about the same as substrate heating coils. A description of how the substrate works with plants and nutrients is given in section 9.5.
The 100 gallon Discus tank was set up over 2 1/2 years ago when we decided to get closer to an Optimum Aquarium. It follows all the principles of TOA except for undergravel heating coils (because of the expense). This tank is called the Almost Optimum Aquarium (AOA).
The 100 gallon tank is the next step in technology because it uses a trickle filter instead of an UGF. Like the 85g, it has an Ehiem 2217 canister filter for additional mechanical filtering and water circulation. Two Ebo-Jaeger 150w heater keep the water at 82o F. Rena end caps, Triton Enhancers and magnetic ballasts in a custom hood holding two 40 watt Tritons, one 40 watt Ultra Tri-Lux and one 40 watt Trichromatic provide light. The light is on 11 hours per day. Approximately 3.5" of 1/16-1/8" quartz gravel is used with powdered laterite in the lower inch.
The automated CO2 system uses a 10 pound bottle, commercial regulator, solenoid and valves, a Dupla bubble counter and CO2 reactor and a Sandpoint II ORP and pH controller (ORP is not controlled).
Fifty percent of the water is changed every two weeks. Duplagan water conditioner is used at water changes along with DuplaPlant tablets. Four DuplaPlant-24 drops are added daily, starting 3 days after a water change. We add sodium bicarbonate and calcium carbonate to set the GH and KH at desired levels. The pH of the tank stays around 6.8, KH=4 degrees, GH=2 degrees, CO2=15 ppm.
The tank has 5 adult discus (one pair spawns every 10 days), 24 cardinal tetras, 1 unidentified "pleco", 6 Corydoras, 1 Farlowella and 2 Siamese algae eaters. There is 1 huge E. bleheri, large clumps of Rotala macranda and indica, Ludwigia sp., 1 large E. major, clusters of E. quadricostatus, a clump of Java moss, various Anubias, 6 stems of Nomaphila stricta and a few crypts. All the plants except the crypts are thriving.
About the only substantial difference between this tank and the 85g is the lack of forced water circulation in the gravel and the temperature. Different plants are used because of the temperature difference, but growth is the same. We find the gravel stays much cleaner than in the 85g since detritus is not pulled into the gravel.
We were unsure about not providing a water circulation mechanism in the substrate but reasoned that plant roots would provide oxygen and Malaysian snails would keep it from compacting. What we found was that the plants flourished for about a year. At that time we noticed a general decline in the overall appearance of the plants. Nothing dramatic, perhaps a little more red algae on the Anubias and a tendency for hair and thread algae to grow a little faster. A slight slowdown in growth was noticed. After 18 months, we removed all the plants and did a complete gravel vacuuming and added some laterite balls. This restored the tank to it's previous conditions and we again saw great plant growth.
The 90 gallon Discus tank was set up about 1 1/2 years ago when we decided to go all out. It completely follows all the principles of TOA. This tank is called the Super Show Tank (SST) and was described in the Aug, Sept, Oct and Dec (1992) issues of Aquarium Fish Magazine (AFM). The SST is the next (last?) step in technology because it uses substrate heating coils and metal halide lighting.
The tank is all glass and has an open top so plants can grow emersed. A trickle filter is used for all filtering and uses Dupla BioKascade balls for media. It does not use a canister filter. An Ebo-Jaeger 200w heater augments the 250 watt heating coils to keep the water at 82o F. A Hamilton hood with two 175w 5500K metal halide bulbs and two 40 watt Triton bulbs is on 11 hours per day. Around 3.5" of 1/16-1/8" quartz gravel is used with powdered laterite in the lower inch.
The automated CO2 system uses a 20 pound bottle, commercial regulator, solenoid and valves, a Dupla bubble counter and CO2 reactor and a Sandpoint II ORP and pH controller (ORP is not controlled).
One third of the water is changed every two weeks. Duplagan water conditioner is used at water changes along with DuplaPlant tablets. Four DuplaPlant-24 drops are added daily, starting 3 days after a water change. We add sodium bicarbonate and calcium carbonate to set the GH and KH at desired levels. The pH of the tank stays around 6.8, KH=4 degrees, GH=2 degrees, CO2=15 ppm.
The tank has 4 adult discus (one pair spawns every month), 10 Lemon Tetras, 1 Pekoltia "pleco", 7 Corydoras (a baby showed up recently), 1 Siamese Algae eater and 2 Otocinclus. There is 1 huge E. osiris growing emersed, large clumps of Rotala macranda and indica, Ludwigia sp. and Cardamine, 1 Barclaya longifolia, clusters of Echinodorus quadricostatus, 6 stems of Ammania gracilis, various Anubias, 6 stems of Nomaphila stricta (emersed and submersed), a clump of Heteranthera zosterifolia and a four varieties of crypts. All the plants are thriving.
The only differences between this tank and the 100g are the substrate heating coils, MH lights and lack of canister filter. The light levels as measured at the surface are about the same (12-15,000 Lux), so except for a spectral difference, the lighting is equivalent. The canister filter in the 100g provides extra mechanical filtration and, since it isn't cleaned as often as it should, probably acts as a nitrate source. As far as we're concerned, the only substantial difference is the substrate heating coils.
The biological differences between this tank and the AOA and the 85g tank are very striking. The main thing that is noticeable is the almost total lack of algae. While the other two tanks always seem on the verge of an algae outbreak, the SST seems to suppress algae. We do find an occasional strand of thread algae and the anubias get a little red algae, but other than that, it's algae free. Even the glass stays much cleaner.
All three tanks have the same additives (water conditioners and fertilizers) and are on the same maintenance cycles. All three are treated the same. The SST just seems to "work" a whole lot better.
Note that the SST has been running for about 18 months and has not shown any signs of a decline like the AOA and Rainbow tank. Why? Let us hypothesize.
After seeing how our tanks work, we've become convinced that substrate heating is the hot setup for plant tanks (no pun intended). A guy who was posting on the computer bulletin boards a couple of years ago (Jeff Frank) spelled it out, but it took this long for it to settle in.
Aquatic plants take in nutrients from both leaves and roots. Different plants get different proportions from leaves or roots, making it necessary to provide nutrient sources in the water and the substrate. As plants grow, they will deplete the nutrient sources and the depleted items must be replenished.
Nutrients in the water are easy to replace. Fish waste will provide nitrogen and phosphorus compounds (usually too much). CO2 injection will provide carbon. Iron sources (Wimex, Dupla, Greenol, etc.) will provide iron. Trace element formulations (Wimex, Dupla) or water changes (if you are lucky) will provide trace elements.
Note that iron needs to be in the proper ionic state (Fe++) to be used by plants, so it should be chelated with EDTA or some such molecule. Unchelated iron will quickly oxidize to the Fe+++ state, making it unusable by plants. Other trace elements also exhibit this behavior. This is why Dupla has "daily drops" - they contain elements that are relatively unstable (or toxic in large doses) and need to be added in small doses at frequent intervals.
Nutrients in the substrate are a little tougher. A very common thing among aquarists is to provide a "rich" substrate. All kinds of goop is put in the bottom of the aquarium to provide the required nutrients. Peat, potting soil, laterite and Tetra Hilena D are some of the more common items. These items may (or may not) provide the required nutrients, but the question of long term viability is unanswered. As the plants use the nutrients, what mechanism is replacing them? There is also a question about the "rich" substrate leaching who-knows-what into the water.
Perhaps long term viability is not a concern to some aquarists. These folks change aquatic interests (and their tank setups) about as often as they change underwear. If the rich substrate produces good results for three or six months, that's great. Or perhaps the plants they are using are "easy" plants and don't even need a rich substrate. As far as they are concerned, the peat and potting soil mixture "worked" and that's all they need to know.
Some folks aren't as concerned about water quality as others and as long as the sixassorted tetras in their plant tank survive, they could care less about what the potting soil is doing to their water.
People think that laterite is used in the substrate to provide iron. This is true to some extent since it does contain some iron. But the iron it contains will be used up fairly quickly. What laterite (and peat) really are providing is a chelating action. Laterite has many negatively charged sites that attract positive ions (like Fe++ and NH4+) and hold the ions in the proper oxidized state until plant roots can use them. When the nutrients are linked to an organic compound, they are easily assimilated by the plant roots.
The substrate heating coils play a role in this by transporting the nutrients in the water to the laterite binding sites via the gentle convection currents created by the heat. The slow currents are good because they give the chemical binding a chance to occur. I would guess that rapid water flow would have a negative impact on this process. The heat in the substrate also speeds up the biological processes involved in the adsorption of nutrients. I also think that the aerobic bacteria in the gravel will tend to deplete oxygen, preventing or reducing the amount of oxidizing taking place.
Some speculation: We think a properly tuned UGF would be able to perform this same function, but to a lesser extent. Laterite plugs, as well as decomposing detritus, offers negative binding sites. A slow flow of aquarium water will move nutrients to the binding sites. Negative aspects of the UGF are too much oxygen, causing nutrients to be oxidized before becoming chelated, and the build up of excessive amounts of crud.
We think that a reverse-flow UGF would not work as well, since the water is biologically filtered before getting to the binding sites giving NH4+ a chance to be converted to nitrite and nitrate. Also iron and other trace elements have a greater chance of being oxidized before arriving at a chelating site. Furthermore, the whole purpose of RUGF is to prevent chelating sites (detritus) from building up in the gravel in the first place.
By having a range of technologies in our aquaria, we have satisfied ourselves that substrate heating and laterite are the best alternatives for providing nutrients to plants. As time and money permit, we will change our other tanks over to substrate heating.
The substrate heating coils and laterite provide an optimum and renewable source of nutrients for plant roots. In addition, they don't pull detritus into the gravel like an UGF. There are other approaches to this, but the coils/laterite combination are easy to setup and operate.
We haven't worked out the costs yet, but we think you can get substrate heating for a lot less than the cost of a pure Dupla setup. We would recommend the Dupla heating coils, since they are not that costly by themselves and are very high quality. If a heating coil should go bad, you have to tear down the entire aquarium to fix it. Not a very appealing thought.
The 24 Volt step-sown transformer can be had for a lot less than the DuplaMat transformer. This will be a big cost saving.
We have seen various temperature controllers offered in the magazines, all for a lot less than the Dupla or Tunze controllers. Extreme accuracy and rapid response aren't very important since the substrate coils are very slow acting (slow to warm up, slow to cool down).
The last component of the Dupla setup is the cable anchors. They offer
suction cups with little plastic cable holders for $2 each and you need
60 or so of them. We would think there must be some kind of homemade
approach that would work just a well, if not better.
Chapter 10 Update at three years
In May, 1994, we completely tore down the 100 gallon discus tank to refresh the substrate and install substrate heating coils. This takes that tank from its Almost Optimum Aquarium (AOA) status to Yet Another Optimum Aquarium (YAOA). The plants, which were declining in robustness, have sprung to life and look better than we remember them ever looking.
We reduced the amount of plants in the tank (as well as in the other tanks) to give a better balance between fish and plants. It is still heavily planted by most standards, but not quite as dense as some Dutch tanks we have seen in pictures. This tank features a large Echinodorus bleheri (Amazon Sword), a group of Barclaya longifolia, some Nomaphila stricta, a bunch of Mexican Oak Leaf and assorted accent plants. The discus have responded to the new planting (or better water or ???) by becoming much more colorful and a new pair has formed and are spawning.
Later, in June, we replanted the 90 g SST. The E. osiris and Anubias coffeeafolia had gotten to the point where we could not plant anything around them. The coffeafolia was spread around 2/3 of the bottom of the tank. Other stuff was just growing where it wanted to; no aquascaping was possible.
We pulled up the osiris and managed to dislodge 3 rows of substrate heating cables. The roots pulled away from the silicon cable just fine but were firmly caught in the cable anchors. When the anchors came up with the plant, the cable came with the anchors. We managed to push the cables back down to the bottom of the gravel, but they aren't arranged neatly anymore. Maybe someday we'll tear it down completely and put smaller cables in (150 watt instead of 250 w).
The 2 1/2 year old Anubias were awesome. The coffeeafolia came out in one piece but was actually 4 distinct rhizomes branching from the original. We broke it into 4 large pieces, about 1 square foot each. Based on prices we've seen in stores, the thing would be worth $300. We also pulled out three enormous A. Barterii (var nana?). Also, a large A. frazeri or barcon had grown up amidst the val.
We also had a large Java Fern in the tank. When we removed it, we found a dead (totally brown) leaf on the rear side. Jave Ferns get spores on the bottom of leaves, just like regular ferns. We always figured the spores floated away from the plant and sprouted somewhere (like normal seeds). On this dead leaf, there was a tiny new fern where each spore would have been. Fours columns by 20 rows of little ferns. Really cool.
Other plants included a large grove of Corkscrew Val, bunches of Mexican Oak Leaf, E. quadricostatus and other odds and ends. We decided to simplify the planting a lot and stick with just a few types of plants. We put the osiris (still growing emersed) in the left rear corner where it won't shade too much of the tank. We put the coffeeafolia around the base of it (it covers the left 1/4 of the substrate).
The Java fern was attached to a fake root and placed to the right of the osiris in the rear. A clump of A. barteri was put in front of that. Hydrocotyle leucocephala was put in the middle rear and allowed to trail from the gravel up to the surface where it is pushed to the left by the current. Sagittaria is planted in front of the Hydrocotyle, adding a nice vertical accent.
The right rear corner is planted entirely in Val (a wedge 1 foot wide by 1 foot back to front). Ludwigia repens (or palustris, who knows?) is along the right side in front of the Val. A clump of Heranthera zosterifolia sits isolated in the middle right foreground, contrasting nicely in both color and texture with the Val. Some Creeping Penny (Lysimachia nummularia) is in the middle left foreground as an accent to the Anubias.
There is much more open gravel in the front now, compared to the "jungle" look of before. We found some Aponogeton bulbs at the fish shop and planted them in the open area. One looks like it's an A. ulvaceous or undulatus (bright green wavey leaves) and the other looks like a Madagascar Lace Plant.
The discus were retuned to the 100 gallon tank where they seem happier with the more secure feeling of a closed hood. Eight silver wild-type Angelfish and two dozen Cardinal Tetras replaced the discus.
The new, simpler planting shows off the eight Angelfish much better than the old crowded mish-mash. We still have six Lemon Tetras with them and they seem happier and school more than before. The Pearl Gouramis begain to seem unhappy with the metal halide lights so we moved them to the discus tank. Rounding out the fish population are two Simaese Algae Eaters, two Farlowella acus, seven Corydoras trilineatus and a bristlenose pleco.
All the plants have taken off exceptionally well. The new arrangement is very attractive and the angelfish are very happy. The only downside was that our older Siamese Algae Eater, Sam, apparently didn't like the new SAE we added (Sam, Jr.) and thought the algae was greener on the other side of the glass. El Morte. These fish aren't good in an open top tank. We knew that, took a chance and lost.
To get enough plants for the new 120 gallon tank we just set up, we trimmed the 100 g YAOA and the 85 g Rainbow tank. One of the main reasons for a new aquarium was to provide a home for a rather large Echinodorus horemanii (the "rare and expensive" red variant, according to Baensch!). It has been occupying the left side of the Rainbow tank for quite a while now and was cramped due to the 18" height and width of the tank. The new tank allows the E. horemanii to spread its 24" long leaves to their best advantage. With that gone, we are transitioning the tank to a home for Crytocoryne species. We have had a stand of some common crypts for quite some time (can't kill them, actually). We have two other types doing well that we have acquired over time which we can't ID right now (we need to bone up on their names). Finally, we obtained some C. retrospiralis six months ago as part of a growth contest for the local society and they have done great. They are replacing the E. hormani. Crypts seem to like the UGF. Coincidentally, a recent article in AFM mentioned the same thing.
Our final tank, the 55 gallon, low-tech tank, has been replaced by the new 120g aquarium. The 55g has defeated our efforts to grow plants without CO2 injection and we are finally giving up. About the only plants that seemed happy were Corkscrew Val and Java Moss. But of course, growing val and Java Moss is not the crowning achievement for a black belt Aquatic Gardener.